
The lunchbox that comes home half full. The dinner plate that gets pushed around but barely touched. The snack that looks fun for about thirty seconds before it ends up on the floor. If you are feeding small children, you know the drill. The gap between what looks appealing and what actually gets eaten is sometimes vast, and the energy required to bridge that gap can be exhausting.
Most kid-friendly food content falls into two traps. Either the recipes are so elaborate that they require special molds, cookie cutters, and ingredients that cost more than the entire grocery trip, or they are so basic that they barely qualify as cooking. There is a middle ground. Food that looks playful without requiring a culinary degree. Food that tastes good enough that the adults at the table will eat it too. Food that does not leave you scrubbing ten different pans at the end of the meal.
These nine recipes are built for real family life. Some are fast enough for a busy afternoon. Some can be made ahead and pulled from the refrigerator when hunger strikes. Some are designed to be built by little hands. Some are for the picky eater who rejects anything green on sight. Every recipe solves a specific problem. The problem of the kid who only eats beige food. The problem of the lunchbox that comes back full. The problem of the afternoon when everyone is hungry and nobody has the patience to cook. This is food that children actually want to eat, made by people who understand how a real kitchen works.
1. Broccoli Cheddar Bites That Actually Disappear
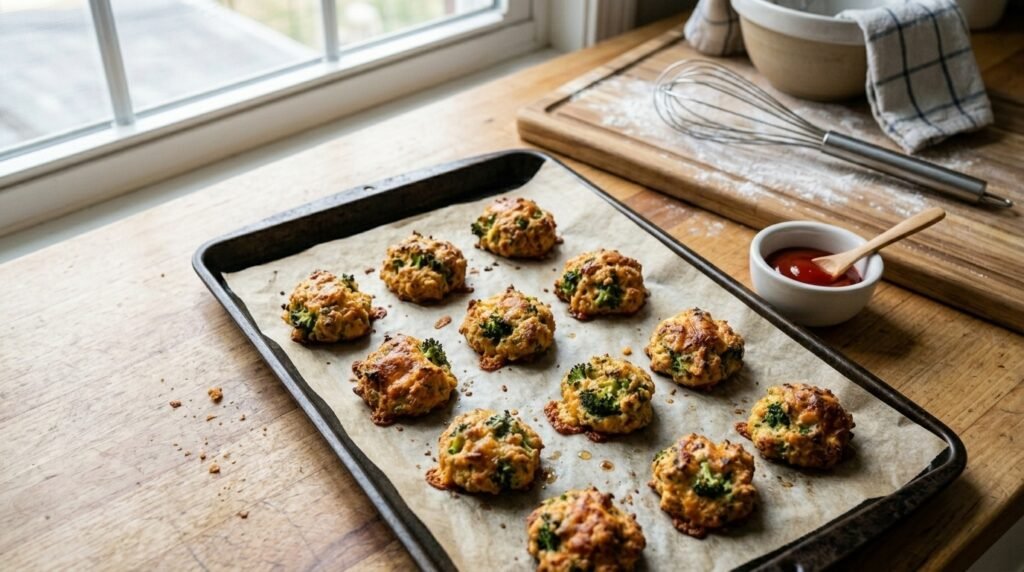
I have watched children who normally reject broccoli eat three of these in a row. The trick is the texture. The outside gets lightly crisp in the oven while the inside stays soft and cheesy, and the broccoli is chopped finely enough that it blends into the bite rather than presenting as a visible green obstacle. This is the version that actually works in a real kitchen with real children.
One thing most recipe cards leave out is that the texture changes depending on how finely you chop the broccoli. Large chunks create a loose, crumbly texture that falls apart. Very fine chopping creates a cohesive, sturdy bite that holds together when small hands pick it up. The food processor is your friend here. A few quick pulses and the broccoli is transformed into something that behaves like an ingredient rather than a vegetable.
Prep: 15 minutes Cook: 20 minutes Total: 35 minutes Serves: 4 (makes about 12 bites) Difficulty: Easy
Ingredients
- 2 cups finely chopped broccoli florets (about one small head)
- 1 cup shredded cheddar cheese
- ½ cup panko breadcrumbs
- 2 large eggs
- ¼ cup grated Parmesan cheese
- ½ teaspoon garlic powder
- ¼ teaspoon salt
- Olive oil spray or a drizzle of olive oil for brushing
Instructions
Preheat the oven to 400°F and line a baking sheet with parchment paper. If your broccoli is not already finely chopped, pulse it in a food processor until it resembles coarse breadcrumbs. Do not over-process or it becomes a paste. You want small pieces, not puree. Squeeze the chopped broccoli in a clean kitchen towel to remove excess moisture. Wet broccoli makes soggy bites.
Combine the broccoli, cheddar, panko, Parmesan, garlic powder, and salt in a bowl. Add the eggs and mix thoroughly. The mixture should hold together when squeezed. If it seems too loose, add a little more panko. Too dry, add a splash of milk. Form the mixture into small patties, about two inches wide and one inch thick. Place them on the prepared baking sheet. Spray or brush the tops lightly with olive oil.
Bake for 18 to 20 minutes, flipping halfway through, until the bites are golden brown and firm to the touch. They should be crispy on the outside and tender on the inside. Let them cool slightly before serving. Hot cheese is a burn hazard for small children.
Tips & Things That Go Wrong
The biggest problem here is moisture. Broccoli holds water, and that water will make the bites fall apart. Squeezing the chopped broccoli thoroughly is not optional. I have skipped this step when I was in a hurry and ended up with a tray of flat, loose, disappointing patties.
Do not overcrowd the baking sheet. The bites need space for air to circulate. If they are crowded, they will steam instead of brown and the texture will be soft rather than crisp. If you have extra mixture, bake in batches.
These can be made smaller for tiny hands or larger as a main dish. Adjust baking time accordingly. Smaller bites cook faster.
Substitutions
Use cauliflower instead of broccoli. Use any melting cheese you have on hand. Mozzarella, Monterey Jack, or a Mexican blend all work. For a gluten-free version, use gluten-free panko or crushed pork rinds. The texture will be different but the structure will still work.
Storage & Reheating
These keep in the refrigerator for 3 days. Reheat in a toaster oven or oven for 5 minutes to restore the crispness. They freeze well for up to 2 months. Freeze them on a baking sheet, then transfer to a freezer bag. Reheat from frozen in the oven for 12 minutes at 400°F. The microwave makes them soft and is not recommended.
Approximate Nutrition Per Bite (2 per serving): 110 calories, 7g protein, 6g carbs, 7g fat, 1g fiber
Squeeze the chopped broccoli in a towel until it is almost dry. Wet broccoli makes the bites fall apart. This is the single most important step.
2. Rainbow Veggie Pizza Toast for Lunch or Snack
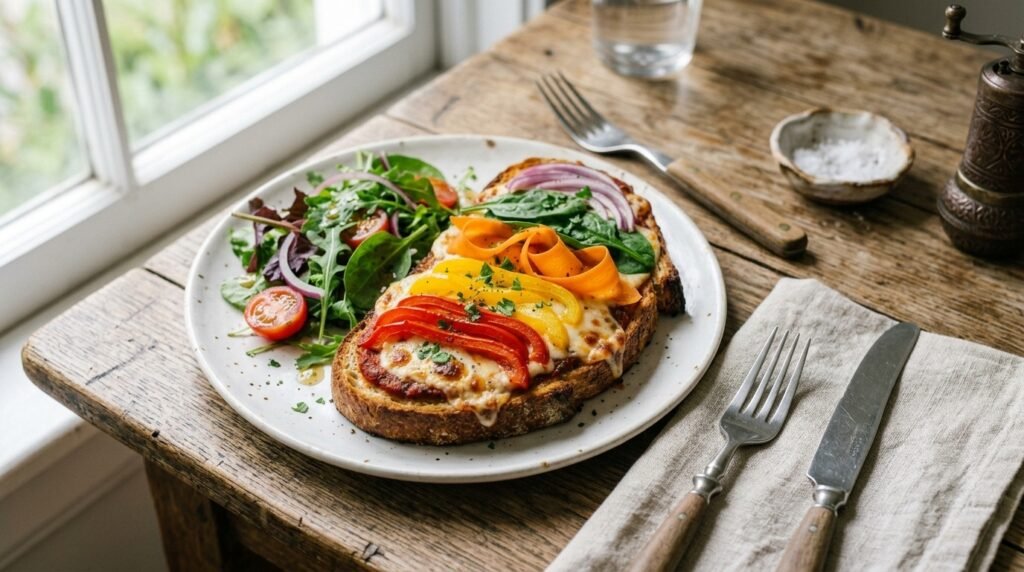
This is the recipe for the kid who is fascinated by arranging things. The vegetables become a project, not an obstacle. The toast gets crispy in the oven, the cheese melts and holds everything together, and the vegetables soften just enough to be pleasant without becoming mushy. It is a lunch that looks like art and eats like comfort food.
Here is the part I would not skip. Arrange the vegetables on the toast before baking. The presentation is part of the appeal. Children who helped place the vegetables are significantly more likely to eat them. I have tested this with my own kids. The toast that they decorated themselves disappeared. The identical toast that I made for myself, with the same vegetables, was met with suspicion.
Prep: 10 minutes Cook: 8 minutes Total: 18 minutes Serves: 2 (makes 2 toasts) Difficulty: Very easy
Ingredients
- 2 thick slices of bread (sourdough or whole wheat work well)
- ½ cup tomato sauce or pizza sauce
- 1 cup shredded mozzarella cheese
- Assorted colorful vegetables, thinly sliced (bell peppers, carrots, spinach, red onion, cherry tomatoes)
- Olive oil for drizzling
- Dried oregano or Italian seasoning (optional)
Instructions
Preheat the oven to 400°F. Place the bread slices on a baking sheet and toast them in the oven for about 3 to 4 minutes until they are lightly crisp. This prevents the bread from getting soggy under the sauce. If you are making these for a toddler who prefers softer food, you can skip this step, but the texture will be less crunchy.
Spread a thin layer of tomato sauce on each toast. Too much sauce makes the bread soggy. A thin layer is enough to coat the surface without overwhelming it. Sprinkle the cheese over the sauce, leaving a little space at the edges.
Arrange the vegetables on top of the cheese in any pattern you like. Rows, a smiley face, a rainbow, or just scattered. The goal is to make the vegetables visible and intentional. Drizzle lightly with olive oil and sprinkle with oregano if using.
Bake for 5 to 7 minutes, until the cheese is melted and bubbling and the edges of the toast are crisp. The vegetables should be slightly softened but still bright. Let cool for a minute before serving.
Tips & Things That Go Wrong
Soggy bread is the main risk. Toasting the bread first and using a thin layer of sauce both help prevent this. If you are meal prepping these, toast the bread and add the toppings just before baking. Storing assembled pizza toast in the refrigerator will result in a soft, unappealing texture.
Do not overload the toast with vegetables. Too many vegetables release water and make the topping slide off. A single layer is sufficient. If you have a child who is enthusiastic about adding vegetables, guide them to place them flat rather than piling them.
Substitutions
Use any bread you have. English muffins, bagels, and flatbreads all work well. Use pesto or hummus instead of tomato sauce for a different flavor profile. Use any cheese you have on hand. The vegetables can be anything colorful. Zucchini, corn, or asparagus spears cut thin all work.
Storage & Reheating
These are best eaten fresh. The bread loses its crispness after refrigeration. If you have leftovers, store them in the refrigerator and reheat in a toaster oven for 5 minutes. The microwave will make them soft and is not recommended.
Approximate Nutrition Per Toast (1/2 of recipe): 250 calories, 12g protein, 28g carbs, 10g fat, 4g fiber
Let the kids arrange the vegetables on the toast. The hands-on involvement makes them significantly more likely to eat what they have created.
3. Egg and Veggie Muffin Cups That Keep for Days
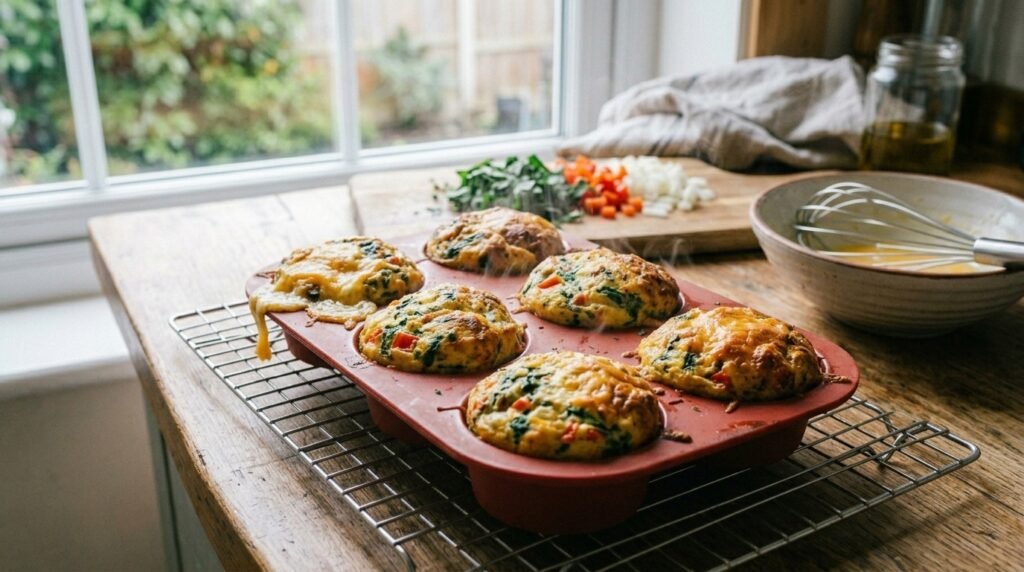
These are the breakfast that keeps on giving. Make them on a Sunday afternoon and you have a high-protein, vegetable-heavy snack or breakfast for the entire week. They are baked, not pan-fried, which means no standing over a stove. And they are portioned into individual servings, which means no negotiation about how much to eat.
The version that actually holds up in a lunchbox is all about the texture. Overbaked eggs are dry and rubbery. Underbaked eggs are wet and unappealing. The sweet spot is a muffin that is just set, with a slightly puffed top and a tender, moist interior. I learned this by making about six batches and slowly dialing in the timing. Pull them out when they are just set, not when they look like they are done. They will continue to cook from residual heat.
Prep: 15 minutes Cook: 18 minutes Total: 33 minutes Serves: 6 (makes 12 muffin cups) Difficulty: Easy
Ingredients
- 10 large eggs
- ½ cup milk (whole or 2%)
- ½ teaspoon salt
- ¼ teaspoon black pepper
- 1 cup finely chopped vegetables (spinach, bell pepper, onion, or any combination)
- 1 cup shredded cheese (cheddar, Monterey Jack, or a blend)
- Olive oil spray or butter for the muffin tin
Instructions
Preheat the oven to 375°F and generously grease a 12-cup muffin tin. If you have a silicone muffin pan, use it. The eggs release from silicone without any sticking, and the cleanup is almost nonexistent.
Whisk the eggs, milk, salt, and pepper in a large bowl until the mixture is completely smooth and uniform. This is the base. Add the vegetables and the cheese and stir to distribute them evenly throughout the egg mixture. Divide the mixture evenly among the muffin cups. Each cup should be about three-quarters full.
Bake for 16 to 18 minutes, but start checking at 15 minutes. The muffins are done when they are puffed and set in the center. They should not jiggle when you gently shake the pan. The tops will be lightly golden and slightly domed. Let them cool in the pan for about 5 minutes. They will deflate slightly, which is normal. Run a thin spatula around the edges and pop them out.
Tips & Things That Go Wrong
The most common problem is sticking. Even with greasing, some muffins will cling to the pan. If the pan is not nonstick, use muffin liners. It adds a step but prevents frustration. I have had mornings where I spent longer scraping egg out of the pan than I did preparing the batter.
Do not overfill the muffin cups. They will puff up and spill over the edges, and then you have a messy pan and uneven muffins. Fill them no more than three-quarters full. The baking time varies depending on the vegetables. If you use watery vegetables like mushrooms, the muffins will take slightly longer to set because of the extra moisture. Pat the vegetables dry with a paper towel before adding them if you notice they are particularly wet.
Substitutions
Use any combination of cooked meats, vegetables, or cheeses you have on hand. Diced ham, crumbled cooked sausage, or chopped turkey all work. For a dairy-free version, skip the cheese and use unsweetened plant milk. The texture will be slightly less rich but still fine. If you want to add greens like spinach, chop them very finely so they distribute evenly throughout the muffins.
Storage & Reheating
These are excellent for meal prep. Refrigerate them in an airtight container for up to 4 days. They reheat in the microwave in 20 seconds or in a toaster oven for a few minutes. They also freeze well for up to 3 months. Freeze them on a baking sheet and then transfer to a freezer bag. Reheat frozen muffins in the microwave for 45 seconds to 1 minute. The texture holds up remarkably well for a baked egg product.
Approximate Nutrition Per Muffin (2 per serving): 120 calories, 9g protein, 3g carbs, 8g fat, 1g fiber
Check these at 15 minutes even if the recipe says 18. Every oven runs differently, and overbaked egg muffins have a rubbery texture that no amount of cheese can fix.
4. No-Bake Peanut Butter & Banana Sushi Rolls
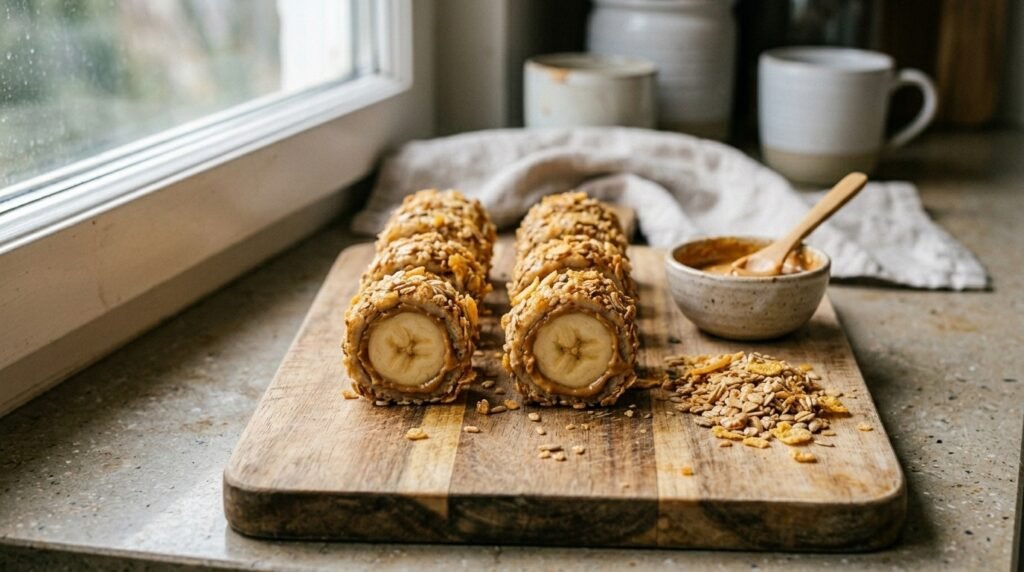
This is the recipe for the afternoon when you need a snack that feels like a treat but actually provides some nutrition. The banana provides natural sweetness and potassium. The peanut butter adds protein and fat. The cereal coating adds crunch. And the sushi presentation is novel enough that children who normally reject fruit or peanut butter are suddenly interested.
Honestly, I would make these on a day when the kids are bored and need something to do. They can help roll the bananas in the peanut butter and coat them in cereal. The mess is manageable and the reward is immediate. They get to eat something they helped make, and you get a few minutes of peace.
Prep: 10 minutes Cook: None Total: 10 minutes Serves: 2 to 4 (makes 8 rolls) Difficulty: Very easy
Ingredients
- 2 large bananas
- ¼ cup peanut butter (or any nut or seed butter)
- ½ cup crushed cereal (rice puffs, corn flakes, or granola)
- Optional: honey or maple syrup for drizzle
Instructions
Peel the bananas and trim the ends. Spread a thin, even layer of peanut butter over the entire surface of each banana. Use a butter knife or a small spatula. The peanut butter should be thin enough to be a coating but thick enough to hold the cereal.
Spread the crushed cereal on a flat plate or a piece of parchment paper. Roll the peanut butter-coated bananas in the cereal, pressing gently so the cereal sticks. Use your hands to press extra cereal onto any bare spots. The entire surface should be coated.
Slice the coated bananas into rounds, about ¾ inch thick. The slices should look like sushi rolls, with the banana visible in the center surrounded by peanut butter and a crunchy coating. Serve immediately. The cereal will stay crunchy for a few hours, but it is best eaten soon after assembly.
Tips & Things That Go Wrong
The peanut butter needs to be spreadable. If it is too thick, warm it in the microwave for about 10 seconds. If it is too thin, the cereal will not stick. Natural peanut butter can be runny and may need to be chilled slightly before use.
Do not slice the bananas too thin. The sushi pieces should hold together, not fall apart. ¾ inch is the sweet spot. If you slice them too thin, the coating will overwhelm the banana. Too thick and they are difficult to eat.
Substitutions
Use any nut or seed butter. Almond butter, sunflower seed butter, or cashew butter all work. Use any crunchy coating. Crushed graham crackers, crushed pretzels, or shredded coconut are all good alternatives. For a sweeter version, drizzle with honey or maple syrup after slicing.
Storage & Reheating
These are best eaten the day they are made. The cereal gets soft after refrigeration. If you must store them, keep them in the refrigerator for up to 1 day. The texture will change. The coating will no longer be crunchy. They are a fresh snack, not a meal prep recipe. That is fine. Sometimes you need a snack that is immediate and satisfying.
Approximate Nutrition Per Roll (2 per serving): 110 calories, 3g protein, 14g carbs, 5g fat, 2g fiber
Slice these just before serving. The banana can brown and the coating can soften if they sit too long. This is a snack that is best fresh.
5. Hidden Veggie Mac and Cheese Bites
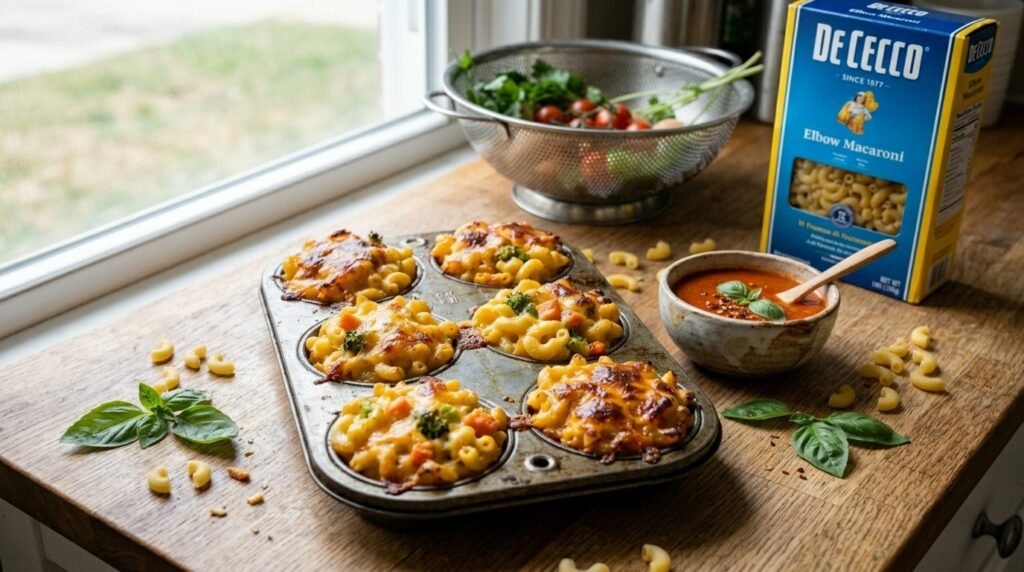
Mac and cheese is the ultimate comfort food for children. The problem is that it is mostly carbohydrates and fat, with very little nutritional density. These bites solve that problem by incorporating pureed vegetables into the cheese sauce. The vegetables are invisible. The texture is exactly the same as regular mac and cheese. The taste is the same. The only difference is that you have added nutrients without a fight.
Here is the part I would not skip. The vegetables need to be pureed until completely smooth. No lumps, no texture. Any visible vegetable will be rejected by the kind of child who needs this recipe. I have tested this with picky eaters. Smooth puree passed the test. Chunky puree did not. The texture matters as much as the flavor.
Prep: 20 minutes Cook: 20 minutes Total: 40 minutes Serves: 4 (makes 12 bites) Difficulty: Medium, because of the puree step
Ingredients
- 2 cups elbow macaroni or any small pasta
- 1 cup cooked vegetables (carrots, butternut squash, or cauliflower)
- ¼ cup milk
- 2 tablespoons butter
- 2 cups shredded cheddar cheese
- ½ teaspoon salt
- ¼ teaspoon garlic powder (optional)
- ½ cup panko breadcrumbs (optional, for topping)
Instructions
Cook the pasta according to the package directions. While the pasta is cooking, puree the cooked vegetables in a food processor until completely smooth. Add a splash of the pasta cooking water if needed to achieve a smooth consistency. The texture should be like a thick sauce.
In a large skillet over medium heat, melt the butter. Add the vegetable puree and milk and stir until combined. Add the cheese and stir until the cheese is melted and the sauce is smooth. Add the salt and garlic powder if using. The sauce should be thick and glossy.
Preheat the oven to 375°F and grease a 12-cup muffin tin. Drain the pasta and add it to the cheese sauce, stirring until every piece is coated. Divide the mixture evenly among the muffin cups. If using panko, sprinkle a little on top of each muffin. Bake for 15 to 18 minutes, until the tops are golden and the edges are crisp. Let cool for 5 minutes before removing from the pan.
Tips & Things That Go Wrong
The vegetable puree must be completely smooth. Any lumps will be visible and may be rejected. If you are using a vegetable like butternut squash, cook it until it is very soft before pureeing. If the sauce seems too thick, add a little more milk. If it seems too thin, add more cheese.
Do not overcook the pasta. It will be baked after the initial cooking, so cook it until it is just al dente. Overcooked pasta will become mushy in the oven.
These bites are sticky. Grease the muffin tin generously or use a silicone muffin pan. If you are using a regular pan, muffin liners are a good investment.
Substitutions
Use any small pasta shape. Shells, rotini, or fusilli all work well. Use any vegetable you like. Sweet potato, zucchini, or peas can all be pureed into the sauce. For a dairy-free version, use vegan cheese and plant milk. The texture will be different but acceptable.
Storage & Reheating
These keep in the refrigerator for 3 days and freeze well for up to 2 months. Reheat in the microwave for 30 seconds or in a toaster oven for 5 minutes. The panko topping will lose its crispness after refrigeration, so add it fresh if you want maximum crunch.
Approximate Nutrition Per Bite (2 per serving): 170 calories, 8g protein, 16g carbs, 9g fat, 2g fiber
Puree the vegetables until completely smooth. No visible vegetables, no texture. This is how you get vegetables into picky eaters without a fight.
6. Pita Pockets With Chicken and Rainbow Crunch
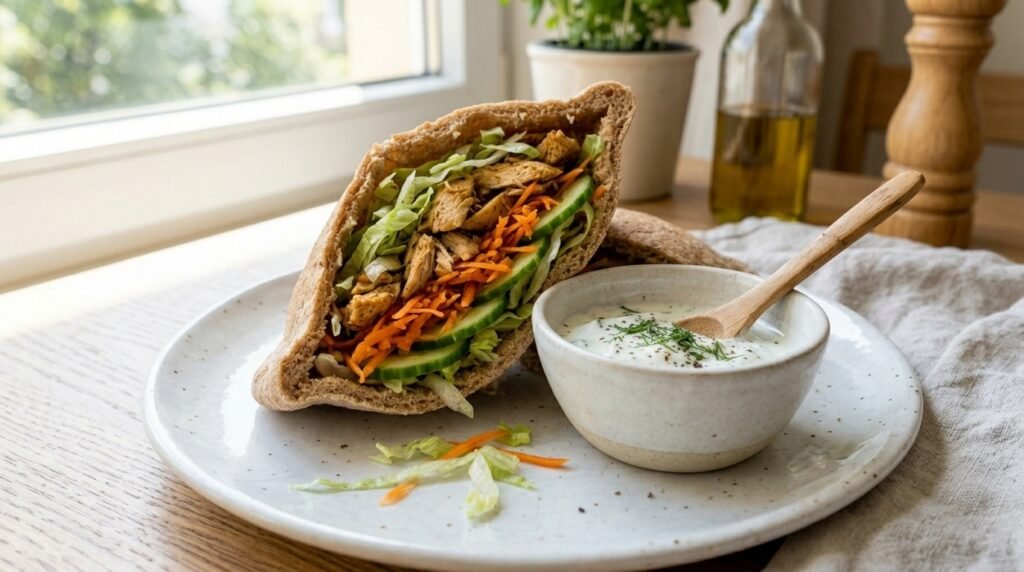
This is the lunch that travels well, survives in a lunchbox, and is actually satisfying to eat. The pita provides a soft, manageable wrapper. The chicken provides protein. The vegetables provide crunch and color. And the whole thing is held together by a simple yogurt sauce that adds creaminess without making the bread soggy.
The version that actually holds up in a lunchbox is all about the assembly. If you put the sauce directly on the bread, the pita gets soggy. If you put the vegetables next to the sauce, they get soft. The trick is to layer the ingredients so the sauce is in the middle, surrounded by the meat and vegetables that act as a barrier. This is not something most recipe cards mention, but it makes a significant difference.
Prep: 15 minutes Cook: 0 minutes (using pre-cooked chicken) Total: 15 minutes Serves: 4 (makes 4 pita pockets) Difficulty: Easy
Ingredients
- 4 whole wheat pita pockets
- 2 cups shredded cooked chicken (rotisserie chicken works well)
- 1 cup shredded lettuce
- 1 cup grated carrots
- ½ cucumber, thinly sliced or ribboned
- ½ cup Greek yogurt
- 1 tablespoon lemon juice
- ¼ teaspoon salt
Instructions
Warm the pita pockets in a toaster or oven for a few minutes to make them pliable. Cold pita cracks when you open it. Cut each pita pocket in half so you have 8 smaller pockets. This is easier for small hands to manage.
In a small bowl, mix the Greek yogurt with the lemon juice and salt. This is your sauce. In a separate bowl, combine the shredded chicken with a little of the sauce to coat it lightly. This adds flavor to the chicken without making the pita soggy.
Open each pita half and layer the ingredients. Start with a little lettuce at the bottom. Add the chicken, then the carrots and cucumber. Drizzle a little extra sauce on top of the vegetables if desired. The sauce should not touch the bread directly. Serve immediately or pack for lunch.
Tips & Things That Go Wrong
Soggy pita is the most common problem. The sauce is the culprit. If the sauce touches the bread, it will soften and eventually become wet and unappealing. Keep the sauce in the center of the filling, away from the bread. Alternatively, pack the sauce separately and let the child add it at the table.
Do not overfill the pita pockets. It is tempting to add as much as possible, but overfilled pita pockets tear and make a mess. A moderate amount of filling is easier to eat and less likely to fall apart.
Substitutions
Use turkey or ham instead of chicken. Use any shredded or ribboned vegetables you have on hand. Bell peppers, snap peas, or shredded cabbage all work. For a vegetarian version, use chickpeas or falafel instead of chicken. Use tahini or hummus instead of yogurt sauce.
Storage & Reheating
These are best packed fresh. The vegetables will soften over time. If you are meal prepping, store the components separately and assemble in the morning. The chicken and sauce keep for 3 days. The pita can be kept at room temperature. Assemble at the last possible moment for the best texture.
Approximate Nutrition Per Pita Half (2 per serving): 210 calories, 16g protein, 22g carbs, 7g fat, 4g fiber
Keep the sauce away from the bread. Soggy pita is the reason these lunches get rejected. Layer the ingredients with the sauce in the center.
7. Apple Cinnamon Oatmeal Bites
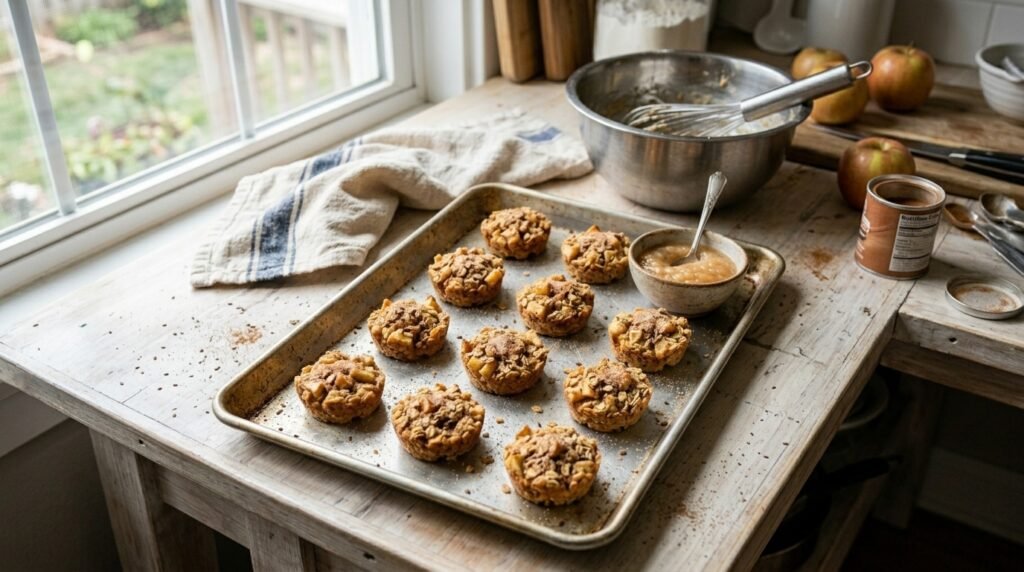
Oatmeal is a breakfast that children often reject. It is warm, comforting, and nutritious, but the texture can be off-putting. These oatmeal bites solve that problem by transforming the oatmeal into a handheld, bakeable form. The outside gets lightly crisp. The inside stays soft. The apple adds natural sweetness and the cinnamon adds warmth. They are oatmeal without the bowl.
One thing most recipe cards leave out is that these bites are best when made with slightly stale oats. Fresh oats can be too absorbent and the bites can become dense. If your oats are fresh, toast them in a dry skillet for a few minutes before using. It changes the texture significantly.
Prep: 15 minutes Cook: 15 minutes Total: 30 minutes Serves: 4 (makes about 12 bites) Difficulty: Easy
Ingredients
- 1 ½ cups old-fashioned rolled oats
- 1 apple, peeled and finely diced
- 1 cup applesauce (unsweetened)
- 1 large egg
- 2 tablespoons maple syrup or honey
- 1 teaspoon cinnamon
- ¼ teaspoon salt
Instructions
Preheat the oven to 375°F and line a baking sheet with parchment paper. In a large bowl, combine the oats, apple, applesauce, egg, maple syrup, cinnamon, and salt. Stir until everything is evenly combined. The mixture should be thick and sticky, like a soft dough.
Using a cookie scoop or a spoon, drop rounded tablespoons of the mixture onto the prepared baking sheet. Flatten each scoop slightly with the back of a spoon. The bites should be about 1 inch thick. They will not spread, so space them about an inch apart.
Bake for 12 to 15 minutes, until the bites are golden brown and firm to the touch. Let them cool on the baking sheet for 5 minutes before transferring to a cooling rack. They will firm up as they cool.
Tips & Things That Go Wrong
The bites can be too moist if the apple pieces are large or if the applesauce is very watery. If the mixture seems too wet, add a little more oats. If it is too dry, add a little more applesauce. The texture should be like a thick batter.
Do not overbake these bites. They will become dry and hard. They are done when they are golden and set. They will continue to cook slightly from residual heat. If you are unsure, take one out and test it. It should be soft in the center but firm enough to hold its shape.
Substitutions
Use any fruit you have on hand. Mashed banana, grated pear, or diced peaches all work well. For a nutty version, add ¼ cup of chopped walnuts or pecans. For a dairy-free version, this recipe is already dairy-free. For a gluten-free version, use certified gluten-free oats.
Storage & Reheating
These keep in the refrigerator for 4 days and freeze well for up to 2 months. Reheat in the microwave for 20 seconds or in a toaster oven for 3 minutes. They are also good cold, making them a great lunchbox addition.
Approximate Nutrition Per Bite (2 per serving): 100 calories, 3g protein, 17g carbs, 2g fat, 3g fiber
Do not overbake these. They will become dry and hard. Pull them out when they are golden and set. They will firm up as they cool.
8. Mini Yogurt and Fruit Parfaits in a Cup
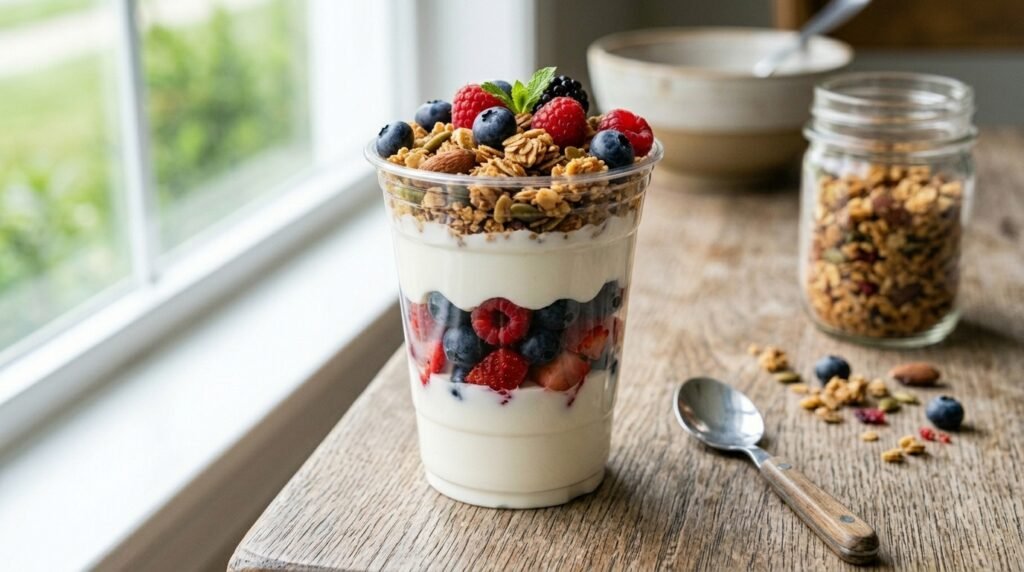
Parfaits are a breakfast that looks impressive and requires almost no effort. The trick is making them feel like an intentional breakfast rather than a snack. Using a clear cup creates visual appeal. The layers separate the textures so the granola stays crunchy until the last bite. And homemade granola takes about 15 minutes to make and tastes significantly better than anything from a bag.
The version that actually holds up in a cup is about layering strategy. If you mix everything together, the granola gets soggy and the yogurt loses its distinct texture. If you assemble it correctly, the experience is completely different. The crunch, the creaminess, the burst of fruit. This is a breakfast that feels like a treat but is actually balanced.
Prep: 10 minutes Cook: 15 minutes (for granola) Total: 25 minutes Serves: 4 Difficulty: Easy
Ingredients
For the Granola:
- 2 cups old-fashioned rolled oats
- ½ cup chopped nuts (almonds, pecans, or walnuts)
- ¼ cup honey or maple syrup
- 2 tablespoons coconut oil or olive oil
- ½ teaspoon cinnamon
- ¼ teaspoon salt
For the Parfaits:
- 2 cups plain Greek yogurt (full-fat recommended)
- 2 cups mixed fresh berries (blueberries, strawberries, raspberries)
- 2 tablespoons honey or maple syrup (optional)
Instructions
To make the granola, preheat the oven to 325°F. Combine the oats, nuts, cinnamon, and salt in a bowl. Whisk the honey and oil together in a small bowl, then pour over the dry ingredients and stir until everything is coated. Spread the mixture on a baking sheet lined with parchment paper. Bake for 12 to 15 minutes, stirring once halfway through, until the granola is golden brown and fragrant. It will not be fully crunchy until it cools. Let it cool completely on the baking sheet.
To assemble the parfaits, layer the yogurt, berries, and granola in cups or small glasses. Start with a layer of yogurt, then a layer of berries, then a layer of granola. Repeat the layering, ending with a layer of granola on top. Drizzle with a little extra honey if you want added sweetness. The granola will stay crunchy for a few hours, but it is best eaten relatively soon after assembly.
Tips & Things That Go Wrong
Do not stir the granola while it is still hot. It will break apart into small pieces instead of forming those desirable clusters. Let it cool completely before breaking it into pieces. The clusters are what make granola special.
The granola will look slightly undercooked when you take it out of the oven. That is fine. It finishes crisping as it cools. If you bake it until it looks fully browned, it will be burnt by the time it is cool.
If you are meal prepping these parfaits, store the granola separately. The texture is the reason this recipe works, and soggy granola ruins the whole experience. I would pack the granola in a small bag or container and add it just before eating.
Substitutions
Use any nuts or seeds you have on hand. Sunflower seeds or pumpkin seeds work well for nut-free granola. Swap the berries for sliced banana, peaches, or any seasonal fruit. Use coconut yogurt for a dairy-free version. The homemade granola stores well in an airtight container for up to 2 weeks.
Storage & Reheating
The granola keeps in an airtight container at room temperature for 2 weeks. The parfaits are best assembled fresh. If you need to make them ahead, store the yogurt and berries in the cup and add the granola just before serving. This keeps the granola crunchy and the breakfast enjoyable.
Approximate Nutrition Per Parfait (1/4 of recipe): 350 calories, 16g protein, 38g carbs, 16g fat, 5g fiber
Store the granola separately from the yogurt and berries. Soggy granola is a disappointment. The crunch is what makes this breakfast feel special.
9. DIY Creative Sandwich Skewers
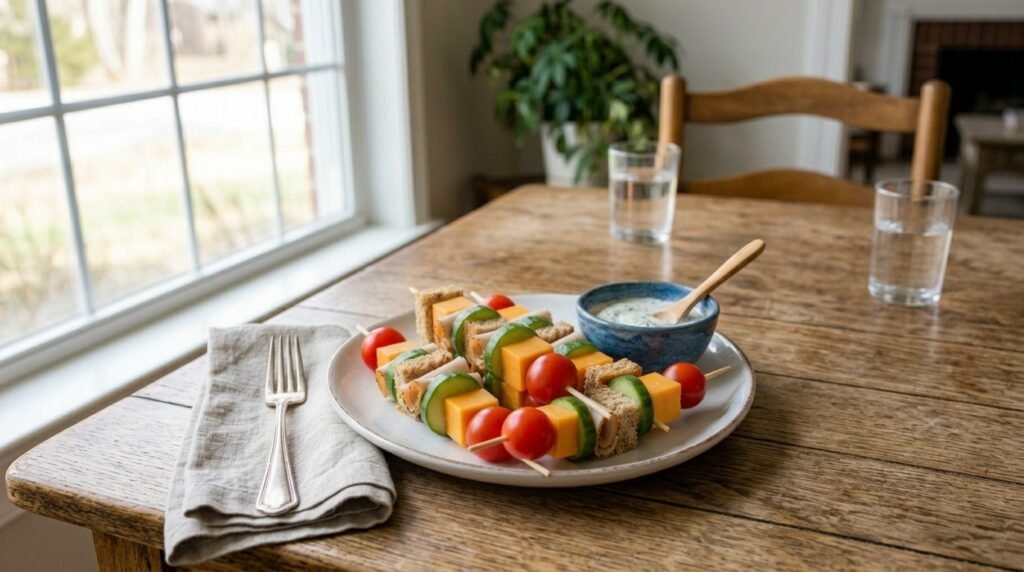
This is the recipe for the child who wants to eat something but is not sure what. The skewer format turns a meal into an interactive experience. The child can choose which pieces to eat, in what order. The presentation is novel and engaging. And the assembly is a project in itself, perfect for a child who wants to help.
Honestly, I would make these on a day when you need the kids to be occupied for 15 minutes. Set out bowls of ingredients and let them thread their own skewers. The satisfaction of making their own food translates directly into increased consumption. I have seen children eat vegetables on a skewer that they would never touch on a plate.
Prep: 15 minutes Cook: None Total: 15 minutes Serves: 4 (makes 8 to 10 skewers) Difficulty: Very easy
Ingredients
- Assorted sandwich ingredients, cut into bite-sized pieces
- Cheese cubes (cheddar, mozzarella, or any firm cheese)
- Cold cuts (turkey, ham, or chicken, rolled or folded)
- Cherry tomatoes or grape tomatoes
- Cucumber rounds
- Small pieces of bread or tortilla
- Optional: olives, bell pepper pieces, avocado chunks
- Wooden skewers (blunt ends are safer for children)
Instructions
Set out all the ingredients in small bowls. If you are making these with children, show them how to thread pieces onto the skewer. Explain that they can make patterns or alternate colors. The goal is fun, not uniformity.
Thread the skewers with a variety of pieces. A typical pattern might be cheese, tomato, turkey, cucumber, bread. But any combination works. The skewers should be full but not so tight that the ingredients are compressed.
Serve the skewers with a dipping sauce if desired. A simple yogurt dip, hummus, or ranch dressing all work well. The dipping component adds another layer of engagement.
Tips & Things That Go Wrong
The main risk is sharp skewers. Use blunt-ended skewers or break the point off if you are concerned. For very young children, you can thread the skewers and remove the wooden stick before serving, turning the skewer into a pile of bite-sized pieces.
Do not make the pieces too large. They should be easy to bite and chew. If the pieces are too large, the skewer becomes difficult to eat and the pieces may slide off.
Substitutions
Use any sandwich ingredients you have on hand. Any cheese, any meat, any vegetable. Fruit can also be included. Grapes, apple chunks, or melon balls all work well. For a vegetarian version, skip the meat and add more vegetables or tofu. For a gluten-free version, use gluten-free bread or skip the bread entirely.
Storage & Reheating
These are best made fresh. The ingredients will soften over time and the skewers will become less appealing. If you must store them, keep them in the refrigerator for up to 2 days. The texture will change. The bread may become soft and the vegetables may lose their crispness. They are a fresh food, not a meal prep food.
Approximate Nutrition Per Skewer (2 per serving): 80 calories, 5g protein, 5g carbs, 5g fat, 1g fiber
Let the kids thread their own skewers. They will be significantly more likely to eat food they have helped prepare. The hands-on involvement changes the dynamic completely.
Frequently Asked Questions About Kid-Friendly Food
How do I get my child to eat vegetables?
There is no single answer, but these recipes are built to help. The Broccoli Cheddar Bites hide the vegetable in a cheesy, crispy format. The Hidden Veggie Mac and Cheese purees vegetables into the sauce. The Rainbow Veggie Pizza Toast makes vegetables visible and intentional. Repeated exposure and positive association are the keys. Offer vegetables in different forms. Let children help prepare them. Do not force them to eat anything, but continue to offer. Eventually, the exposure works.
What can I pack in a lunchbox that will stay fresh?
The Pita Pockets and the Egg Muffin Cups both travel well. The key is keeping wet ingredients separate from dry ingredients. For the pita pockets, keep the sauce separate until the child is ready to eat. For the egg muffins, they are self-contained and do not leak. Avoid foods that wilt or become soggy. Toast gets soft. Lettuce wilts. The recipes in this article have been chosen in part for their ability to hold up in a packed lunch.
How can I make these recipes more toddler-friendly?
Cut everything into small, manageable pieces. For the Broccoli Cheddar Bites, make them smaller. For the sandwich skewers, remove the wooden stick and serve the pieces on a plate. For the Pita Pockets, cut them into wedges rather than serving them whole. Texture matters. Toddlers often prefer foods that are easy to chew and not too slippery. The Egg Muffin Cups are ideal because they are easy to hold and do not crumble.
Can I freeze these recipes?
The Broccoli Cheddar Bites, Egg Muffin Cups, Hidden Veggie Mac and Cheese Bites, and Apple Cinnamon Oatmeal Bites all freeze well. The other recipes are better fresh. Freeze them in a single layer on a baking sheet, then transfer to a freezer bag. Reheat in the oven or toaster oven for the best texture. The microwave can make them soft, so use it only if you are in a hurry.
What if my child has a food allergy?
These recipes are designed to be flexible. Use nut-free butters for the Banana Sushi. Use gluten-free bread and oats for the pizzas and oatmeal bites. Use dairy-free cheese and milk for the mac and cheese bites and egg muffins. The substitutions section in each recipe provides alternatives. Always check ingredient labels and consult with a pediatrician if you have concerns about introducing new foods to a child with known allergies.
Making Kid-Friendly Food Work in Your Kitchen
The most important decision you will make is not which recipe to try first. It is how much patience you bring to the process. Children do not always eat what you expect them to eat. They may reject the first batch and accept the second. They may eat a recipe perfectly at home and refuse it in a lunchbox. They may go through phases where they will only eat one color of food. This is all normal.
If I had to recommend a starting point, I would say start with the Broccoli Cheddar Bites. They are the most universally accepted recipe in this collection. The cheesy, crispy format is familiar and appealing. The vegetable is hidden but not invisible. And the recipe is forgiving. If the bites fall apart, they still taste good. If they are overbaked, they are still edible. It is a recipe that gives you room to learn.
Feeding small children is a daily negotiation. These recipes are designed to make that negotiation a little easier. They are not magic. They will not cure picky eating overnight. But they will give you more tools, more options, and more confidence in the kitchen. And that is what matters. A confident cook who is willing to try something new is the best thing you can bring to the table.