
Every parent knows the particular disappointment of opening a lunchbox at the end of the day to find half-eaten food, a sad sandwich, and a bag of chips that somehow disappeared while the actual lunch remained untouched. The problem is not that kids are not hungry—they are. The problem is that lunch needs to survive four hours inside a backpack, compete with recess, and still taste good enough to eat without a microwave or a parent hovering nearby. Most lunch packing advice focuses on nutrition labels and Instagram-worthy bento boxes, but the real challenge is keeping textures distinct, ingredients fresh, and flavors interesting enough to actually get eaten.
Common advice tells you to pack the same things over and over again, or worse, to assemble lunch in the morning chaos when time is short and patience is thinner. Sandwiches get soggy. Vegetables get floppy. Cold pasta turns into a gluey mass that no child will touch. The recipes that usually make the rounds are either too complicated for a Tuesday morning or so simple that boredom sets in by Wednesday.
This collection solves those problems by focusing on make-ahead lunches that stay good from Monday through Friday. Some are fully assembled and ready to grab. Some pack better with components kept separate until lunchtime. Every recipe here has been tested for texture, temperature, and the mysterious ability to hold a child’s attention. These are lunches that actually work in the real world—the world of hurried mornings, backpack abuse, and kids who would rather talk than eat.
1. Crispy Chicken & Cottage Cheese Wraps
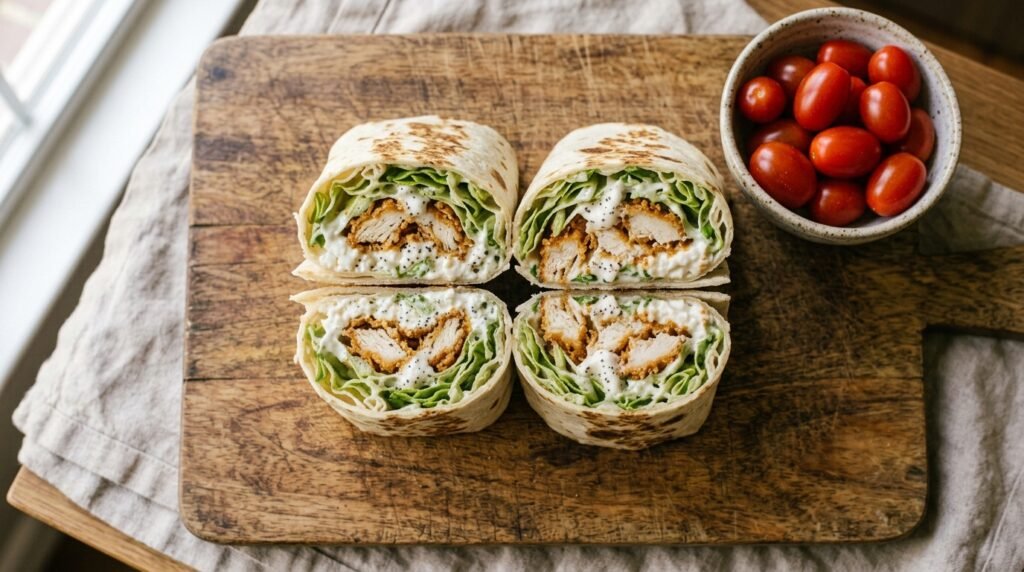
This wrap solves the soggy sandwich problem by using shredded chicken with a bit of texture and cottage cheese instead of the usual lunchmeat and mayo. The chicken stays moist without making the tortilla wet, and cottage cheese brings creaminess plus a surprising amount of protein. I first made these for my own kids on a Sunday afternoon, and by Thursday they were still asking for them. That is a rare win in the lunch-packing world.
The key here is using already-cooked chicken. This is a leftover-friendly recipe—rotisserie chicken works beautifully, as does any roasted or baked chicken from a previous dinner. If you are batch-cooking, this is a great use for that second chicken breast that never made it into the meal plan. The wraps hold up for three days in the refrigerator, and they do not get that damp, sad texture that sandwiches develop overnight.
Prep: 15 minutes Cook: 0 minutes Total: 15 minutes Serves: 4 (makes 4 wraps)
Ingredients:
- 2 cups cooked chicken, shredded or chopped (rotisserie or leftover works best)
- 1 cup cottage cheese (full-fat or 2%)
- 1/2 cup shredded cheddar cheese
- 1/2 cup shredded romaine lettuce
- 1/4 cup ranch dressing or plain Greek yogurt
- 4 large flour tortillas (burrito size)
- Salt and pepper to taste
Instructions:
Cooking Tips & Mistakes to Avoid
Do not overfill these wraps. It is tempting to pack in as much chicken as possible, but an overstuffed wrap becomes difficult to roll and tears during lunch, which means a messy container and a kid who loses interest. About 1/2 cup of filling per tortilla is the sweet spot. If you use Greek yogurt instead of ranch, add a little extra seasoning—yogurt is tangier and needs more salt than dressing.
The lettuce goes in last and stays crisp best if you add it just before rolling, not mixed into the filling. Wet lettuce is the enemy of a good wrap. If you are meal prepping for the week, store the lettuce separately and add it in the morning.
Substitutions:
- Turkey or ham instead of chicken works well.
- Spinach leaves instead of romaine, though they are more delicate.
- Dairy-free ranch or hummus if you are avoiding dairy.
Storage & Reheating:
These keep in the refrigerator for up to three days. Wrap them tightly so the tortilla does not dry out. They are meant to be eaten cold, so no reheating required. If you are sending one in a lunchbox, pack it with an ice pack to keep the cottage cheese cool.
Approximate Nutrition Per Serving (1 wrap): 390 calories, 28g protein, 28g carbohydrates, 18g fat
Use leftover chicken from a previous dinner to make these wraps. Cold rotisserie chicken works great, but any cooked chicken you have will do. The key is shredding it, not chopping it too finely—you want some texture in the bite.
2. Snack Plate Lunchboxes
Some kids do not want a sandwich. They want options. They want to pick and choose and eat what looks good at that moment. This snack plate lunchbox embraces that instinct instead of fighting it. It is essentially a deconstructed lunch that gives kids control over what they eat and in what order. The texture variety keeps it interesting—crunchy cucumbers, creamy egg, soft turkey, crisp crackers.
This is my go-to lunch when I do not have leftovers and I need to pack something in under ten minutes. It feels like a lot of separate items, but each component is simple and the combination adds up to a balanced meal. The best part? Kids eat more when they have choices. That is not a parenting theory—it is what I have observed packing lunches for over a decade.
Prep: 10 minutes Cook: 0 minutes Total: 10 minutes Serves: 1 (multiply as needed)
Ingredients:
- 2 hard-boiled eggs, peeled and quartered
- 3 slices turkey or ham, rolled up
- 1/2 cup cucumber slices
- 1/4 cup grape tomatoes
- 1/4 cup red bell pepper strips
- 1/4 cup whole-grain crackers
- 2 tablespoons hummus or ranch dip
- 1/4 cup blueberries or grapes
Instructions:
- Place the hard-boiled egg quarters in one section of the lunch container.
- Roll the turkey slices and place them next to the eggs.
- Add cucumber slices, tomatoes, and bell pepper strips to another section.
- Put crackers in a separate compartment so they stay crisp.
- Add the hummus or dip in a small container or silicone cup.
- Add fruit to the remaining section.
Cooking Tips & Mistakes to Avoid
Hard-boiled eggs get a sulfurous smell if overboiled. I cook mine for nine minutes, then immediately transfer them to an ice bath. That stops the cooking process and makes peeling significantly easier. If you are making these for the week, peel them all at once and store them in a covered container with a damp paper towel to keep them from drying out.
Cucumbers and bell peppers release moisture over time. Pack them with a small paper towel in the container to absorb excess liquid. That keeps the other items from getting damp. The dip should always go in a separate container, not directly on the plate—a toddler’s finger will find it, and suddenly the crackers become soggy.
Substitutions:
- Cheese cubes instead of rolled meat.
- Carrot sticks or snap peas instead of cucumber.
- Apples or strawberries instead of blueberries.
Storage & Reheating:
Assemble snack plates the night before and store in the refrigerator. This is one of the few lunches that actually tastes better after being refrigerated because the components hold their texture well. No reheating required. The eggs and turkey stay fine for two to three days.
Approximate Nutrition Per Serving: 330 calories, 20g protein, 25g carbohydrates, 16g fat
I keep a batch of hard-boiled eggs in the refrigerator every week. They turn snack plates, salads, and wraps into high-protein lunches in minutes. If your child does not like the yolk, mash it into egg salad and use it as a dip.
3. Crunchy Turkey and Hummus Pinwheels
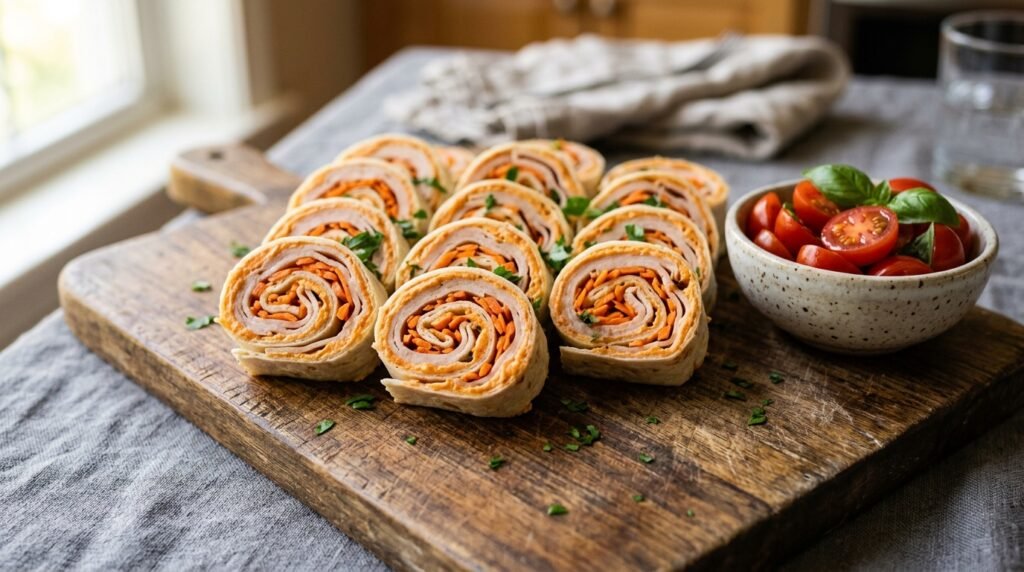
Pinwheels are the lunchbox equivalent of a magic trick—they look impressive, they are fun to eat, and they take almost no effort to assemble. The rolling creates layers of flavor that kids find more interesting than a flat sandwich. These particular pinwheels get their crunch from shredded carrot, which adds texture without making the tortilla wet.
Hummus brings moisture and flavor without the risk of sogginess. It acts as the glue that holds everything together, and it packs a protein punch alongside the turkey. I have made these with roasted red pepper hummus, classic plain hummus, and even a lemony herb version—they all work, though I find kids prefer the mildest option. If your child finds hummus too intense, mix it with a little Greek yogurt to tone it down.
Prep: 10 minutes Cook: 0 minutes Total: 10 minutes Serves: 4 (makes 4 pinwheels, about 16 slices)
Ingredients:
- 4 large flour tortillas
- 1/2 cup hummus (plain or roasted red pepper)
- 8 slices turkey breast
- 1 cup shredded carrot
- 1 cup fresh spinach leaves (optional)
Instructions:
- Lay a tortilla flat on a cutting board. Spread a thin layer of hummus over the entire surface, leaving about 1/2 inch at the edges.
- Layer two slices of turkey over the hummus, covering most of the tortilla.
- Sprinkle shredded carrot evenly over the turkey. Add spinach leaves if using.
- Roll the tortilla tightly from one end to the other, tucking the filling in as you go.
- Repeat with the remaining tortillas and filling.
- Wrap each rolled tortilla in plastic wrap and refrigerate for at least 30 minutes before slicing—this helps the pinwheels hold their shape.
- Slice each roll into 1-inch thick rounds using a sharp knife.
Cooking Tips & Mistakes to Avoid
Chilling the rolled tortillas before slicing is the step you cannot skip. If you slice them immediately, the filling squishes out and you get messy pinwheels that fall apart in a lunchbox. I roll these up after dinner, chill them overnight, and slice them in the morning—the rounds are clean, tight, and easy to pack.
Carrots release a little moisture as they sit, which is why I use hummus instead of cream cheese. The hummus absorbs some of the liquid and keeps the pinwheels from getting weepy. If you want to add cucumber, pat it very dry with a paper towel first.
Substitutions:
- Roast beef, ham, or chicken instead of turkey.
- Shredded zucchini or bell pepper instead of carrot.
- Cream cheese instead of hummus for a milder flavor.
Storage & Reheating:
Pinwheels keep for three days in the refrigerator. Store them whole and slice each day to keep the edges looking fresh. If you slice them all at once, the cut edges can dry out slightly. Pack them with a small ice pack to keep the hummus at a safe temperature.
Approximate Nutrition Per Serving (1 pinwheel): 210 calories, 12g protein, 22g carbohydrates, 9g fat
Chilling the rolled tortillas for at least 30 minutes before slicing is non-negotiable. It sets the filling and gives you clean, intact pinwheels that do not unravel in a lunchbox.
4. Pasta Salad with Chickpeas and Cheddar
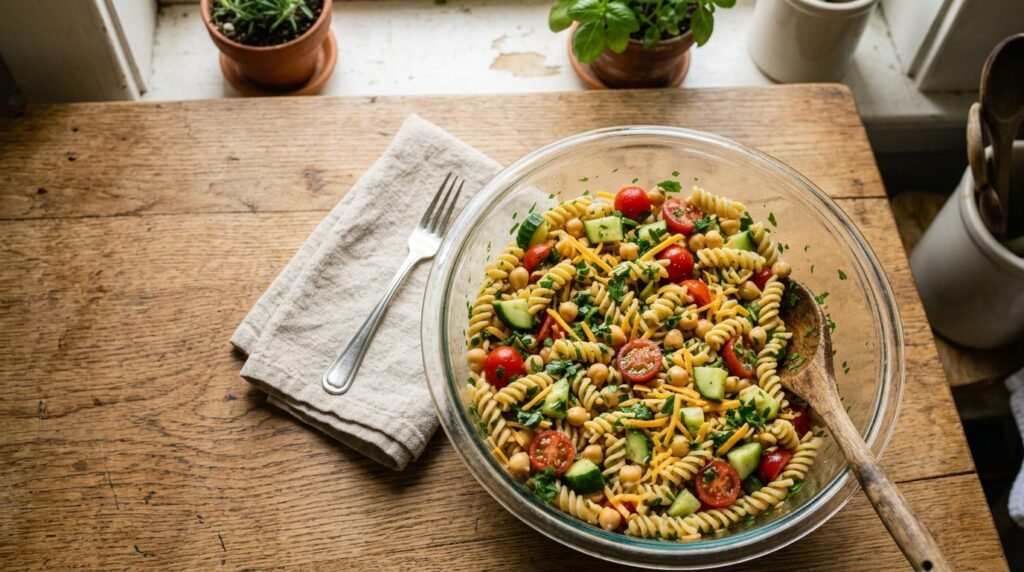
Pasta salad solves the lunch problem in a different way—it is sturdy, portable, and does not need to be kept hot or cold to be enjoyable. It is actually better after a night in the refrigerator because the flavors meld together. The pasta holds up better than lettuce-based salads, and the chickpeas add protein and texture that keeps kids full until dinner.
I like rotini or fusilli for this recipe because the spirals catch the dressing and the small pieces of cheese. The shape also makes it easier for kids to eat with a fork or their fingers, which is a consideration in a lunchroom setting. This is the kind of lunch I make on Sunday afternoon and portion out for the entire week—it gets eaten because it is familiar enough to be comforting and varied enough to be interesting.
Prep: 15 minutes Cook: 10 minutes Total: 25 minutes Serves: 6
Ingredients:
- 8 ounces rotini pasta
- 1 can (15 ounces) chickpeas, rinsed and drained
- 1 cup cherry tomatoes, halved
- 1 cup cucumber, diced
- 1/2 cup shredded cheddar cheese
- 1/4 cup fresh parsley, chopped
- 1/3 cup Italian dressing (or 1/4 cup olive oil + 2 tablespoons red wine vinegar + 1 teaspoon Italian seasoning)
Instructions:
- Cook the pasta according to package directions until al dente. Drain and rinse under cold water until completely cool.
- In a large bowl, combine the cooled pasta, chickpeas, tomatoes, cucumber, cheddar cheese, and parsley.
- Pour the dressing over the pasta salad and toss until everything is evenly coated.
- Refrigerate for at least 30 minutes before serving. The pasta absorbs some of the dressing as it sits, so you may want to add an extra drizzle before packing.
Cooking Tips & Mistakes to Avoid
Undercook the pasta slightly if you are making this for the week. Pasta continues to absorb moisture in the refrigerator, and starting with al dente pasta prevents it from turning into a mushy mess by Thursday. I cook mine a minute or two less than the package time.
Rinsing the pasta under cold water stops the cooking process and removes excess starch, which keeps the pasta salad from becoming gummy. Do not skip this step—it makes a noticeable difference in texture. If you are packing this for lunch, portion it into individual containers so kids can grab one in the morning without the risk of the entire batch getting dropped on the floor.
Substitutions:
- White beans or black beans instead of chickpeas.
- Any small pasta shape—bowties, shells, or elbows all work.
- Mozzarella instead of cheddar for a milder cheese flavor.
Storage & Reheating:
Pasta salad keeps for four days in the refrigerator. It is meant to be eaten cold, so no reheating is needed. If the pasta seems dry after a couple of days, add a splash of olive oil or a teaspoon of vinegar and toss it before packing.
Approximate Nutrition Per Serving: 310 calories, 12g protein, 38g carbohydrates, 13g fat, 5g fiber
Rinse the cooked pasta under cold water until it is completely cool. This removes the starch and keeps the pasta salad from turning into a gluey mess by the middle of the week.
5. Cheesy Broccoli and Rice Bites
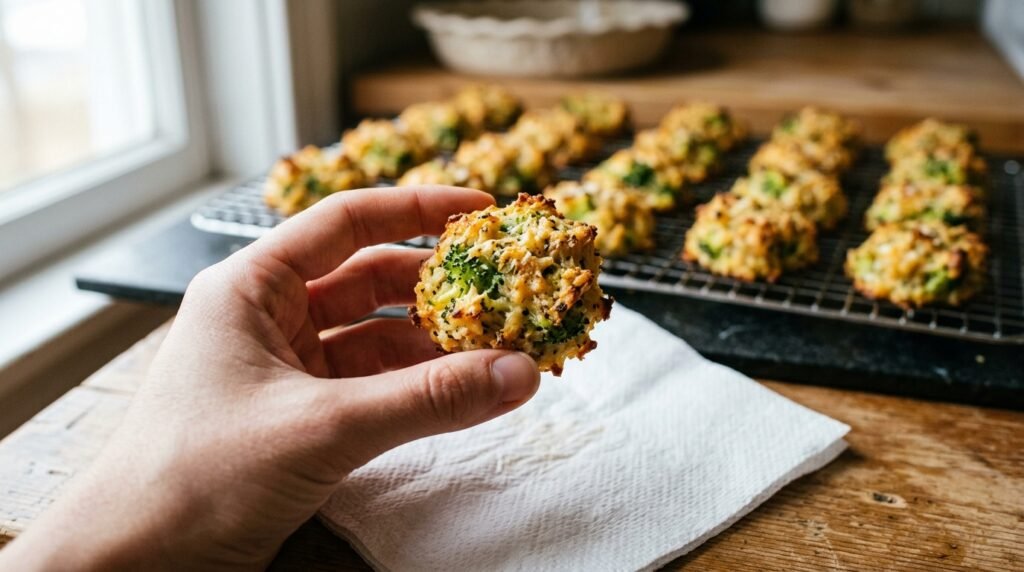
This recipe turns leftover rice and frozen broccoli into a lunchbox-friendly finger food that kids actually want to eat. The bites are cheesy, savory, and just crisp enough on the outside to be interesting, while the inside stays tender and moist. They are also small enough to pack alongside fruit and a dip without requiring the child to use a fork.
I developed this recipe because my youngest would not touch broccoli in any recognizable form, but would eat these bites without complaint. The cheese does a lot of the heavy lifting here, masking the bitterness that puts some kids off vegetables. If you have a child who avoids green things, this is a reliable way to get some vegetables into their lunch without a battle.
Prep: 15 minutes Cook: 20 minutes Total: 35 minutes Serves: 6 (makes about 20 bites)
Ingredients:
- 2 cups cooked white or brown rice (day-old rice works best)
- 1 cup frozen broccoli, thawed and finely chopped
- 1 cup shredded cheddar cheese
- 1/4 cup grated Parmesan cheese
- 2 large eggs, beaten
- 1/4 cup breadcrumbs (plus extra for coating)
- 1/2 teaspoon garlic powder
- Salt and pepper to taste
Instructions:
- Preheat the oven to 375°F. Line a baking sheet with parchment paper.
- In a large bowl, combine the rice, chopped broccoli, cheddar cheese, Parmesan, eggs, breadcrumbs, garlic powder, and a pinch of salt and pepper. Mix well until the mixture holds together when squeezed.
- Form the mixture into small balls or patties, about 1 1/2 inches wide. Roll them in additional breadcrumbs for a crispier coating.
- Place the bites on the prepared baking sheet, leaving a little space between them. Bake for 18 to 20 minutes, until golden brown and firm to the touch.
- Let them cool on the baking sheet for a few minutes before transferring to a wire rack—they are fragile when hot and firm up as they cool.
Cooking Tips & Mistakes to Avoid
The biggest issue with these bites is moisture. Broccoli contains a lot of water, and if you do not remove some of it, the bites will be soggy instead of crisp. After thawing the broccoli, I press it between paper towels or squeeze it in a clean kitchen towel to remove as much liquid as possible. That extra step makes a real difference in the final texture.
Day-old rice works better than freshly cooked rice for this recipe. Fresh rice is too sticky and wet, which can make the bites dense. If you are cooking rice specifically for this recipe, spread it on a baking sheet to cool and dry out for about 15 minutes before using it.
Substitutions:
- Cauliflower or grated zucchini instead of broccoli.
- Mozzarella or Monterey Jack instead of cheddar.
- Gluten-free breadcrumbs for a gluten-free version.
Storage & Reheating:
These bites keep in the refrigerator for up to four days. They are best cold or at room temperature, which makes them perfect for lunchboxes. If you want to reheat them, a toaster oven works better than a microwave—microwaving makes the coating soft instead of crisp. I usually pack them cold and let them come to room temperature by lunchtime.
Approximate Nutrition Per Serving (about 3 bites): 180 calories, 10g protein, 16g carbohydrates, 9g fat
Press the thawed broccoli between paper towels to remove as much water as you can. Wet broccoli makes soggy bites, and nobody wants a sad, limp rice ball in their lunchbox.
6. Mini Meatball and Veggie Bento
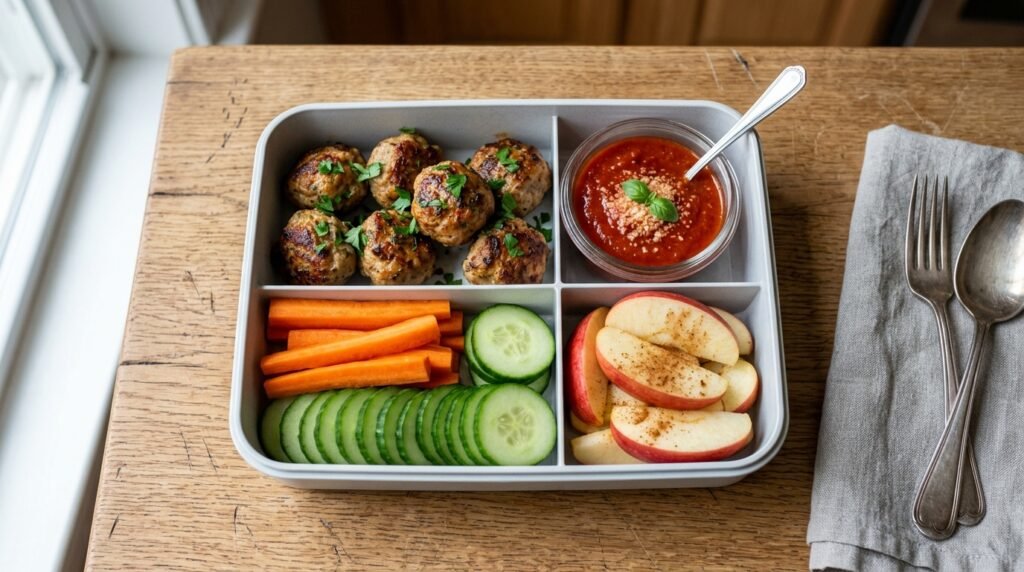
This bento-style lunch is built around mini meatballs that are easy to make in large batches and freeze well, so you can pull them out as needed. The meatballs are small enough for little hands to manage, and they are packed with protein without the preservatives or sodium of packaged lunch meat. The marinara dipping sauce makes them feel like a treat, even though they are built from whole ingredients.
I keep a bag of these mini meatballs in the freezer at all times. They are a lifesaver on Sunday afternoons when I need to fill five lunch containers and I do not want to stand over the stove. The meatballs defrost in the refrigerator overnight and are ready to pack in the morning. They do not get rubbery like larger meatballs sometimes do, and the small size means they cool quickly and stay safe in a lunchbox.
Prep: 15 minutes Cook: 18 minutes Total: 33 minutes Serves: 6 (makes about 30 small meatballs)
Ingredients:
- 1 pound ground turkey or chicken
- 1/2 cup breadcrumbs
- 1/4 cup grated Parmesan cheese
- 1 large egg
- 1 teaspoon garlic powder
- 1 teaspoon dried oregano
- 1/2 teaspoon salt
- 1/4 cup marinara sauce (for dipping, plus more for packing)
- Vegetable sides: carrot sticks, cucumber slices, grape tomatoes
- Fruit: apple slices or grapes
Instructions:
- Preheat the oven to 400°F. Line a baking sheet with parchment paper.
- In a large bowl, combine the ground turkey, breadcrumbs, Parmesan, egg, garlic powder, oregano, and salt. Mix until just combined—overmixing makes tough meatballs.
- Roll the mixture into 1-inch balls and place them on the prepared baking sheet. They should be close together but not touching.
- Bake for 16 to 18 minutes, until browned on the outside and cooked through (internal temperature should reach 165°F).
- Let the meatballs cool completely before storing.
- To pack a lunch, place 4 to 5 meatballs in one section of a lunch container, add vegetable sticks and fruit to other sections, and include a small container of marinara sauce for dipping.
Cooking Tips & Mistakes to Avoid
Use your hands to mix the meatball ingredients rather than a spoon. The meat stays tender if you handle it gently. Overmixing is the number one reason homemade meatballs turn out dense and bouncy instead of tender. Mix just until the breadcrumbs and egg are evenly distributed.
Baking instead of frying means you can make a large batch without standing at the stove for 20 minutes. The meatballs still get a nice golden-brown exterior from the oven heat. If you want extra color on the meatballs, give them a few minutes under the broiler before pulling them out.
Substitutions:
- Ground beef or pork instead of turkey.
- Panko instead of regular breadcrumbs for a lighter texture.
- BBQ sauce or ranch dressing instead of marinara.
Storage & Reheating:
Cooked meatballs keep in the refrigerator for four days or in the freezer for up to three months. For lunchboxes, I pack them cold or at room temperature—they are fully cooked and safe to eat without reheating. If you want to reheat them, a microwave works in about 30 seconds, but they are also fine straight from the container.
Approximate Nutrition Per Serving (5 meatballs + sauce): 210 calories, 20g protein, 10g carbohydrates, 11g fat
These meatballs freeze beautifully. I make a double batch on a Sunday, freeze them on a baking sheet, then transfer them to a freezer bag. They defrost overnight in the refrigerator and are ready to pack in the morning.
7. Rainbow Veggie and Hummus Sandwich
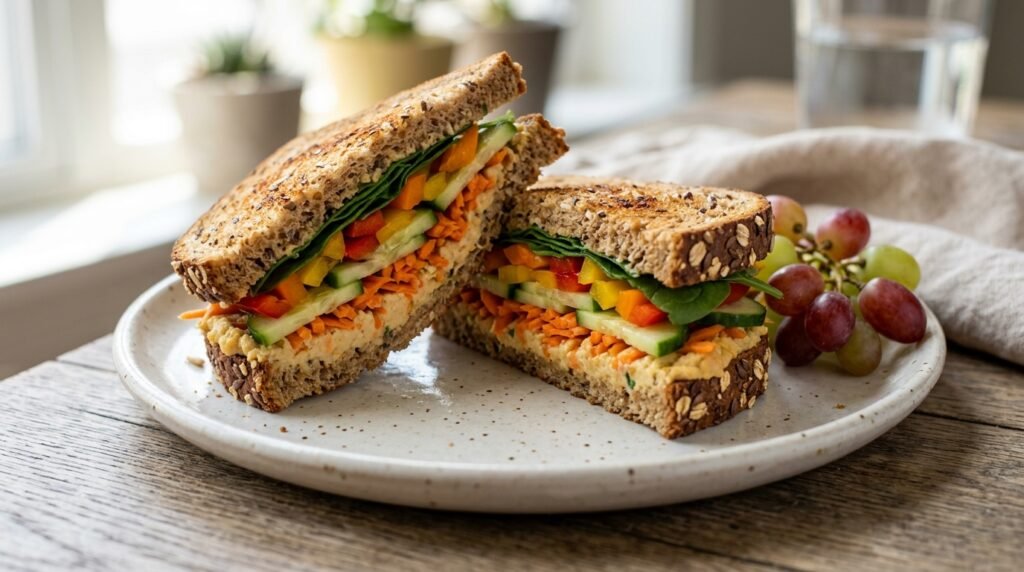
This sandwich is proof that a plant-based lunch can be satisfying and protein-rich without relying on processed deli meats. The hummus provides moisture and creaminess, while the vegetables contribute crunch, color, and a range of textures that keep each bite interesting. It is also a good option for kids who have dairy restrictions or simply prefer non-meat options.
The key to making this sandwich work in a lunchbox is ingredient placement. The hummus acts as a barrier between the bread and the moist vegetables, preventing that sad, soggy bread problem that ruins most sandwiches by lunchtime. I pack the spinach and cucumber separately and let the child assemble the sandwich at lunch—it takes ten seconds and keeps the bread from disintegrating.
Prep: 10 minutes Cook: 0 minutes Total: 10 minutes Serves: 1 (multiply as needed)
Ingredients:
- 2 slices whole-grain bread
- 2 tablespoons hummus (plain or roasted red pepper)
- 1/4 cup shredded carrot
- 1/4 cup cucumber, sliced thin
- 1/4 cup bell pepper strips
- A handful of fresh spinach leaves
Instructions:
- Toast the bread lightly if you want extra crispness—this helps it hold up against the hummus and vegetables.
- Spread 1 tablespoon of hummus on each slice of bread.
- Layer the carrot, cucumber, bell pepper, and spinach on one slice of bread.
- Top with the other slice of bread, press down gently, and cut in half.
- If packing for later, wrap the sandwich in parchment paper and pack the spinach and cucumber separately to add just before eating.
Cooking Tips & Mistakes to Avoid
Do not slice the cucumber too thickly. Thin slices stay crisp and are easier to bite through without the filling sliding out. If you are packing this sandwich overnight, spread hummus all the way to the edges of the bread—it creates a moisture barrier that keeps the bread from getting soggy. The thicker the layer, the better the protection.
This sandwich is best assembled in the morning, even if you have prepped the vegetables the night before. The vegetables release water as they sit, and while hummus is better than mayonnaise at handling moisture, it can only do so much. If you absolutely must make it the night before, use toasted bread and spread the hummus generously.
Substitutions:
- Avocado instead of hummus for a different creamy layer.
- Any sliced vegetables you have on hand—zucchini, radish, or jicama all work well.
- Gluten-free bread for a gluten-free option.
Storage & Reheating:
This sandwich is best eaten the day it is made. If you need to prep ahead, store the hummus and bread separately from the vegetables and assemble in the morning or at lunchtime. No reheating required—this is a cold sandwich through and through.
Approximate Nutrition Per Serving: 280 calories, 10g protein, 38g carbohydrates, 11g fat, 8g fiber
Spread hummus all the way to the edges of the bread. It creates a moisture barrier that keeps the bread from turning into a soggy sponge. Thin cucumber and moist vegetables will ruin a sandwich if they are not properly protected.
Frequently Asked Questions
Can I make these recipes ahead of time for the entire week?
Most of these recipes are designed for exactly that. The wraps, pinwheels, pasta salad, rice bites, and meatballs all hold up for four days in the refrigerator. The snack plate and sandwich are better assembled the night before or morning of, though you can prep the components in advance. I usually spend about an hour on Sunday prepping everything and then assemble individual lunches each evening.
What is the best way to store these lunches to keep them fresh?
Use airtight containers with divided sections to keep different foods from touching and transferring moisture. For items that need to stay crisp, like crackers or cucumber, pack them in separate compartments or use a silicone cup. An ice pack is essential for items like wraps, meatballs, and pinwheels that contain dairy or meat.
Can I freeze any of these recipes?
The mini meatballs freeze exceptionally well. Cook them completely, cool them on a baking sheet, then transfer to a freezer bag. The rice bites also freeze well—reheat them in a toaster oven or regular oven for best results. The pasta salad and wraps do not freeze well because the textures change significantly. For those, stick with refrigerator storage.
How can I add more protein to these lunches?
Most of these recipes already have a solid protein base, but you can boost it further. Add a hard-boiled egg to any lunchbox as a side item. Serve the pasta salad with a side of Greek yogurt. Add extra chickpeas to the pinwheels or use a protein-rich hummus that contains added pea protein. You can also pack a small container of cottage cheese or yogurt as a side dish.
What if my child has a dairy allergy?
Several recipes in this collection can be adapted. The wraps use cottage cheese and cheddar, but you can substitute dairy-free cheese and a hummus-based spread. The rice bites can be made without cheese, though you will need to add extra seasoning and maybe some nutritional yeast for flavor. The meatballs contain Parmesan, but you can leave it out and the meatballs still hold together. The sandwich is naturally dairy-free.
My child is very picky and will not eat vegetables. What can I do?
Start with the rice bites and meatballs—both hide vegetables in a format that kids recognize. The broccoli is chopped small and mixed with cheese, which masks the flavor. The pinwheels also work well because the vegetables are paired with familiar ingredients like turkey and hummus. I often let my kids help with the chopping and assembly, which makes them more likely to try the finished product.
Conclusion
These recipes cover the range of real-world lunch packing—some are fully assembled and ready to grab, others are component-based so kids can assemble them at lunchtime. Some rely on leftovers, some are planned from scratch. The common thread is that they all survive the journey from refrigerator to lunchbox to cafeteria table without losing their appeal. They are not restaurant food. They are not Instagram-perfect. They are lunches that actually get eaten.
If you are starting from scratch, begin with the pasta salad and the mini meatballs. Both are forgiving, make large batches, and hold up for days. Once you have those in rotation, add the pinwheels and wraps to break up the sandwich monotony. The snack plate is the last resort on the busiest mornings—it requires zero cooking and takes about as long as filling a container.
A lunchbox that comes home empty is a small victory, but it is a meaningful one. The food you pack matters less than the fact that your child actually ate it. These recipes increase the odds of that happening, and that is all I ever wanted from a lunch.