
The rainy afternoon when the kids are bouncing off the walls and you need an activity that doesn’t involve turning on the oven. The birthday party that needs a creative activity that won’t leave your kitchen looking like a disaster zone. The desire to make something fun and memorable with your children is real, but the reality of baking with toddlers is a different challenge entirely. Flour everywhere, sugar on the floor, and a mess that takes longer to clean up than the activity lasted.
Most kids’ baking content misses the mark. The recipes that claim to be easy often require ingredients that are hard to find or steps that are too complicated for small hands. The ones that claim to be fun are often so messy that you spend more time cleaning than baking. And the ones that claim to be no-bake still manage to find a way to involve the oven. The advice looks good on a blog but falls apart in a real kitchen with real toddlers who want to help and have very little patience.
These five no-bake superhero cookie recipes solve specific problems. One is for the child who loves Spider-Man and wants to make something with webs. One is for the child who loves the Hulk and wants to smash things. One is for the parent who needs an activity that takes 15 minutes from start to finish. Every recipe has a reason to exist beyond being another cookie idea. They are built with real ingredients, real toddler attention spans, and real family expectations in mind. No oven, no complicated steps, and no regrets.
1. Spider-Man Web Oreos
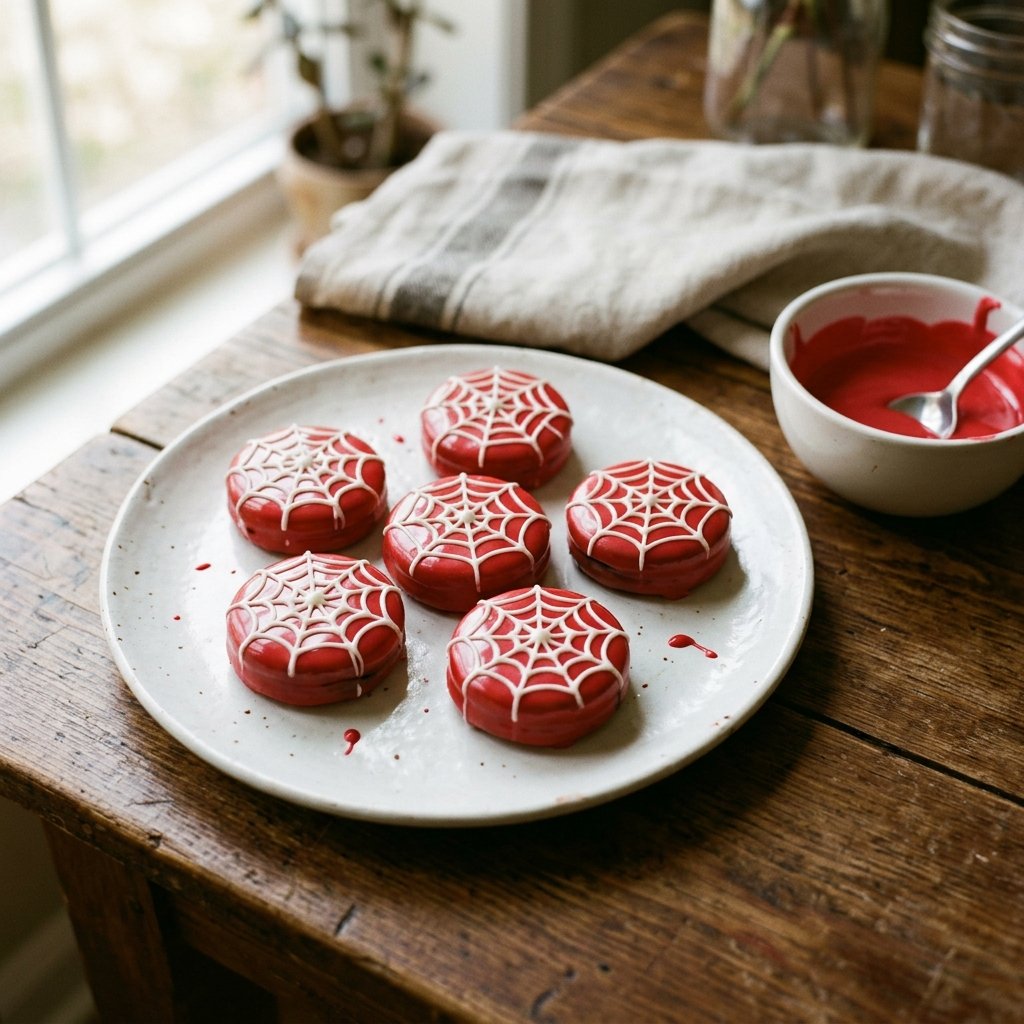
These are the Spider-Man cookies that solve the no-bake problem. The Oreos are dipped in red candy melts and decorated with a white chocolate web pattern. The process is simple enough for toddlers to help with, and the results are impressive enough to make everyone feel like a superhero. The whole thing comes together in about 15 minutes.
Here is the part I would not skip. The candy melts need to be melted slowly and carefully. If they are overheated, they will seize and become unusable. Microwave them in short bursts and stir frequently. The consistency should be smooth and pourable, like thick honey. If the candy melts are too thick, add a teaspoon of coconut oil to thin them out.
Prep: 10 minutes Cook: None Total: 10 minutes Serves: 4 (makes 12 cookies) Difficulty: Very easy
Ingredients
- 12 Oreo cookies
- 1 cup red candy melts
- ¼ cup white chocolate chips
- 1 teaspoon coconut oil (optional, for thinning)
Instructions
Line a baking sheet with parchment paper. Place the red candy melts in a microwave-safe bowl and microwave in 30-second bursts, stirring between each, until completely smooth and melted. If the mixture is too thick, stir in a teaspoon of coconut oil.
Using a fork or dipping tool, carefully dip each Oreo into the melted red candy coating, turning to coat completely. Allow excess coating to drip off, then place the coated cookies on the prepared baking sheet.
Melt the white chocolate chips in a small microwave-safe bowl, stirring until smooth. Transfer the melted white chocolate to a small piping bag or zip-top bag with a tiny corner snipped off. Pipe a spider web pattern on each cookie by drawing a few concentric circles and dragging a toothpick from the center outward to create web lines. Let the cookies set completely before serving.
Tips & Things That Go Wrong
The candy melts can seize if they are overheated. Microwave in short bursts and stir frequently. The white chocolate can be difficult to pipe if it is too thick. Add a drop of coconut oil to thin it. The cookies can fall apart if they are not handled gently. Hold them carefully when dipping.
Substitutions
Use any sandwich cookie you like. Use any color candy melts you like. For a dairy-free version, use dairy-free chocolate chips.
Storage & Reheating
These keep in an airtight container at room temperature for up to a week. Do not refrigerate, as the coating can become sticky and lose its shine.
Approximate Nutrition Per Cookie: 140 calories, 2g protein, 18g carbs, 7g fat, 1g fiber
Melt the candy melts slowly in short bursts. Overheating makes them seize and become unusable.
2. Hulk Smash Cookies

These are the Hulk cookies that toddlers will love to make. The dipping and smashing process is tactile and satisfying. The green color is bold and fun. The edible eyes make the cookies come alive. The whole thing comes together in about 15 minutes.
The trick is the “smash” step. After dipping the cookies in green candy melts, the crushed candy pieces are pressed into the coating before it sets. The result is a textured, cookie-like surface that looks like the Hulk has been there. The edible eyes are added last for a playful touch.
Prep: 10 minutes Cook: None Total: 10 minutes Serves: 4 (makes 12 cookies) Difficulty: Very easy
Ingredients
- 12 Oreo cookies
- 1 cup green candy melts
- ½ cup crushed green candy pieces (like green M&Ms or green sprinkles)
- 12 edible candy eyes
- 1 teaspoon coconut oil (optional, for thinning)
Instructions
Line a baking sheet with parchment paper. Place the green candy melts in a microwave-safe bowl and microwave in 30-second bursts, stirring between each, until completely smooth and melted. If the mixture is too thick, stir in a teaspoon of coconut oil.
Using a fork or dipping tool, carefully dip each Oreo into the melted green candy coating, turning to coat completely. Allow excess coating to drip off, then place the coated cookies on the prepared baking sheet. Immediately sprinkle the crushed green candy pieces over the wet coating, pressing gently to adhere. Place two edible eyes on each cookie before the coating sets. Let the cookies set completely before serving.
Tips & Things That Go Wrong
The candy melts can set too quickly if the kitchen is cold. Work quickly and in small batches. The crushed candy pieces can fall off if they are not pressed firmly. Press them gently into the wet coating. The edible eyes can slide if the coating is too wet. Add them after the coating has started to set slightly.
Substitutions
Use any color candy melts you like. Use any crushed candy you like. For a dairy-free version, use dairy-free chocolate chips.
Storage & Reheating
These keep in an airtight container at room temperature for up to a week. Do not refrigerate, as the coating can become sticky.
Approximate Nutrition Per Cookie: 150 calories, 2g protein, 19g carbs, 8g fat, 1g fiber
Work quickly when adding the sprinkles and eyes. The candy coating sets fast, and the decorations need to be added while it is still wet.
3. Captain America Shield Pretzels
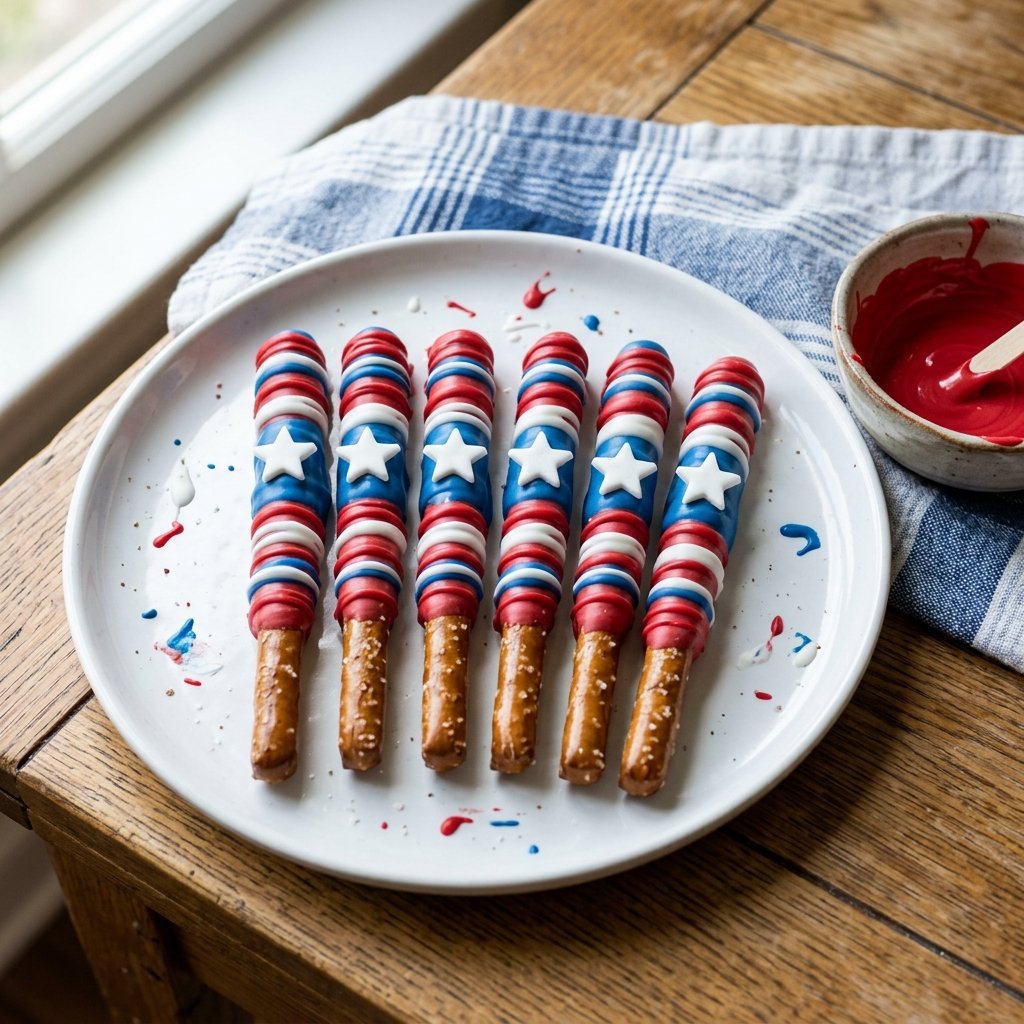
One thing most recipe cards leave out is that the pretzel rods need to be dried thoroughly before dipping. Wet pretzels will cause the candy coating to seize and become lumpy. Pat them dry with a paper towel before starting. The stripes are easiest to create by dipping the pretzel at an angle.
Prep: 10 minutes Cook: None Total: 10 minutes Serves: 4 (makes 12 pretzels) Difficulty: Easy
Ingredients
- 12 pretzel rods
- ½ cup red candy melts
- ½ cup blue candy melts
- ¼ cup white candy melts
- 1 teaspoon coconut oil (optional, for thinning)
Instructions
Line a baking sheet with parchment paper. Melt the red, blue, and white candy melts in separate microwave-safe bowls in 30-second bursts, stirring between each, until smooth. If the mixtures are too thick, stir in a teaspoon of coconut oil.
Dip each pretzel rod into the red candy melts, covering about half of the rod. Dip the opposite end into the blue candy melts, leaving a white strip in the middle. Use a toothpick to create a star pattern on the white strip using the white candy melts. Place the pretzels on the prepared baking sheet and let them set completely before serving.
Tips & Things That Go Wrong
The pretzels can be difficult to dip if they are too long. Break them in half if needed. The candy melts can drip if they are too thin. Let the excess drip off before placing the pretzels on the baking sheet. The star pattern can be tricky. Use a toothpick to create a simple star shape.
Substitutions
Use any color candy melts you like. Use any pretzel shape you like. For a dairy-free version, use dairy-free chocolate chips.
Storage & Reheating
These keep in an airtight container at room temperature for up to a week.
Approximate Nutrition Per Pretzel: 120 calories, 2g protein, 18g carbs, 5g fat, 1g fiber
Pat the pretzels dry before dipping. Wet pretzels cause the candy coating to seize and become lumpy.
4. Superhero Oreo Pops
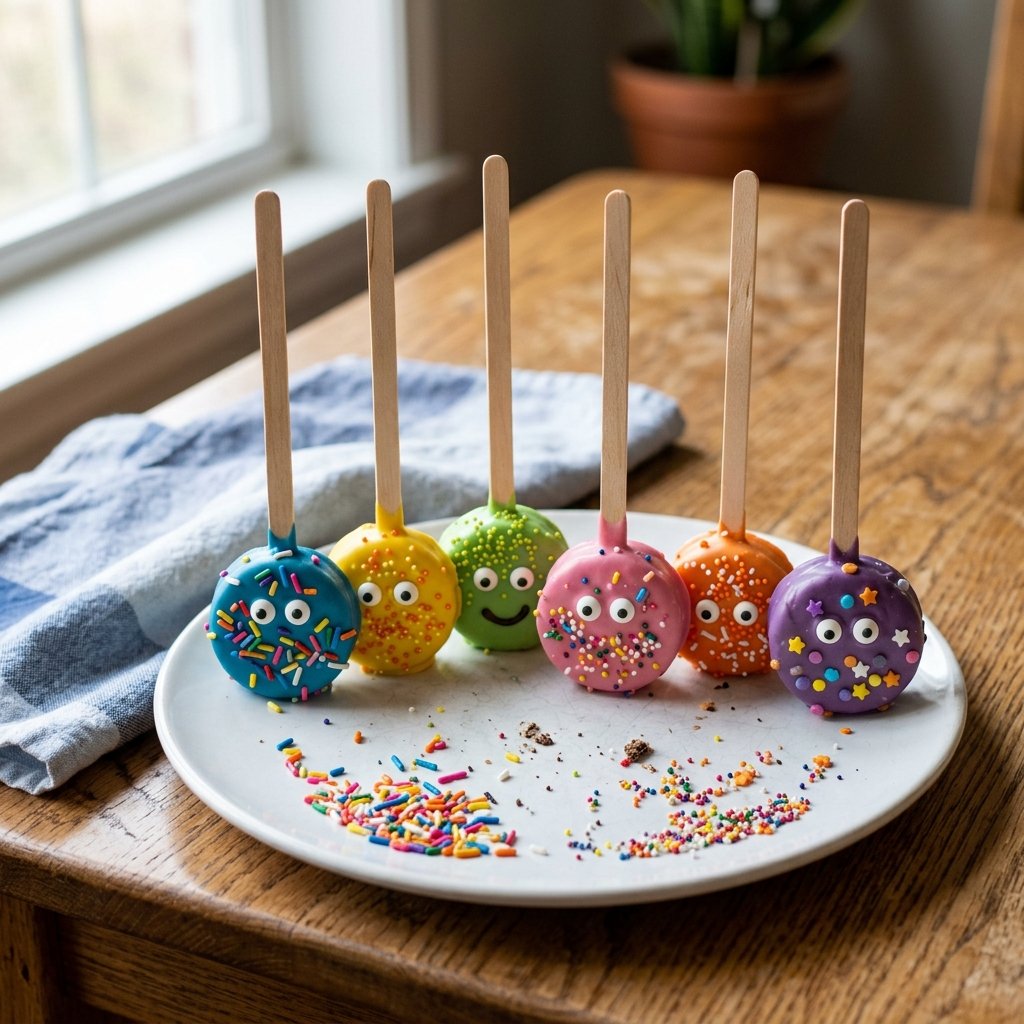
These are the superhero pops that toddlers will love to make and eat. The Oreos are dipped in colorful candy melts and decorated with sprinkles and edible eyes. The pops are easy to hold and fun to eat. The whole thing comes together in about 15 minutes.
The trick is inserting the sticks carefully. The Oreo should be placed on the stick before dipping. If you try to insert the stick after dipping, the coating will crack. Place the stick in the cream filling, sandwich the Oreo together, and then dip. The stick should be secure and the cookie should be intact.
Prep: 10 minutes Cook: None Total: 10 minutes Serves: 4 (makes 12 pops) Difficulty: Easy
Ingredients
- 12 Oreo cookies
- 12 lollipop sticks
- 1 cup candy melts (any color)
- Assorted sprinkles
- Edible candy eyes
- 1 teaspoon coconut oil (optional, for thinning)
Instructions
Line a baking sheet with parchment paper. Carefully insert a lollipop stick into the cream filling of each Oreo, making sure it is centered and secure. Melt the candy melts in a microwave-safe bowl in 30-second bursts, stirring between each, until smooth. If the mixture is too thick, stir in a teaspoon of coconut oil.
Dip each Oreo pop into the melted candy coating, turning to coat completely. Allow excess coating to drip off, then place the pops on the prepared baking sheet. Immediately add sprinkles and edible eyes before the coating sets. Let the pops set completely before serving.
Tips & Things That Go Wrong
The Oreo can fall apart if the stick is inserted too forcefully. Insert the stick gently and twist it slightly. The coating can drip if it is too thin. Let the excess drip off before setting the pops down. The sprinkles can slide off if the coating is too wet. Add them immediately after dipping.
Substitutions
Use any cookie you like. Use any color candy melts you like. For a dairy-free version, use dairy-free chocolate chips.
Storage & Reheating
These keep in an airtight container at room temperature for up to a week.
Approximate Nutrition Per Pop: 150 calories, 2g protein, 20g carbs, 8g fat, 1g fiber
Insert the stick gently and twist it slightly to secure it in the cream filling. A secure stick prevents the Oreo from falling apart.
5. Cookie Monster Batman Bites
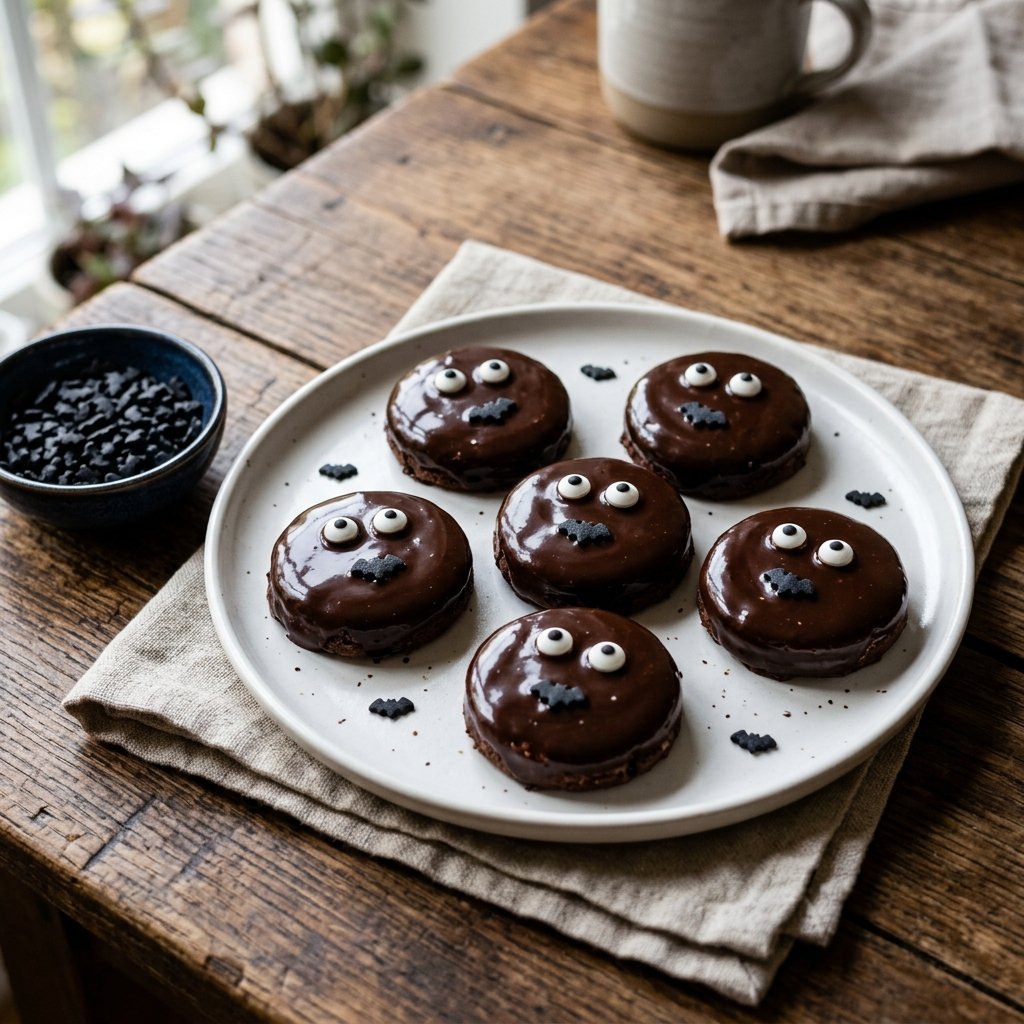
These are the Batman cookies that toddlers will love to make. The dark chocolate coating is rich and satisfying. The bat sprinkles and edible eyes make the cookies come alive. The whole thing comes together in about 15 minutes.
This is where the texture changes. The dark chocolate should be melted until it is smooth and glossy. If it is overheated, it will seize and become dull and grainy. Melt it slowly and stir frequently. The bat sprinkles should be added immediately after dipping so they adhere to the wet coating.
Prep: 10 minutes Cook: None Total: 10 minutes Serves: 4 (makes 12 cookies) Difficulty: Very easy
Ingredients
- 12 Oreo cookies
- 1 cup dark chocolate chips
- Bat-shaped sprinkles
- Edible candy eyes
- 1 teaspoon coconut oil (optional, for thinning)
Instructions
Line a baking sheet with parchment paper. Place the dark chocolate chips in a microwave-safe bowl and microwave in 30-second bursts, stirring between each, until completely smooth and melted. If the chocolate is too thick, stir in a teaspoon of coconut oil.
Using a fork or dipping tool, carefully dip each Oreo into the melted chocolate, turning to coat completely. Allow excess chocolate to drip off, then place the coated cookies on the prepared baking sheet. Immediately press a bat sprinkle and two edible eyes onto each cookie before the chocolate sets. Let the cookies set completely before serving.
Tips & Things That Go Wrong
The chocolate can seize if it is overheated. Microwave in short bursts and stir frequently. The bat sprinkles can fall off if they are not pressed gently. Press them into the wet chocolate. The edible eyes can slide if the chocolate is too wet. Add them after the chocolate has started to set slightly.
Substitutions
Use any cookie you like. Use any chocolate you like. For a dairy-free version, use dairy-free chocolate chips.
Storage & Reheating
These keep in an airtight container at room temperature for up to a week.
Approximate Nutrition Per Cookie: 160 calories, 2g protein, 20g carbs, 9g fat, 1g fiber
Melt the chocolate slowly and stir frequently. Overheated chocolate becomes dull and grainy instead of smooth and glossy.
Frequently Asked Questions About No-Bake Superhero Cookies
Can I make these cookies ahead of time?
Yes, all of these cookies can be made ahead of time and stored in an airtight container at room temperature for up to a week. They are perfect for party prep, birthday parties, or weekend activities.
Can toddlers really make these cookies?
Yes, with adult supervision, toddlers can help with many steps. They can dip the cookies, add sprinkles, and place the edible eyes. The adult should handle the melting and dipping of hot candy melts. The goal is fun and involvement, not perfection.
What are the best candy melts to use?
Brand-name candy melts are the most reliable. They melt smoothly and set with a glossy finish. Avoid generic brands, which can be waxy or have an off flavor. Wilton and Merckens are good options.
Can I use chocolate instead of candy melts?
Yes, but the results will be different. Chocolate needs to be tempered to get a glossy finish and a snap. Candy melts are easier to work with and do not require tempering. If you use chocolate, add a tablespoon of coconut oil to make it more workable.
How do I prevent the cookies from getting soggy?
Do not refrigerate the cookies. The moisture in the refrigerator can make the coating sticky and soft. Store them at room temperature in an airtight container.
Making No-Bake Superhero Cookies Work in Your Kitchen
The most important decision you will make is not which cookie to try first. It is how you approach the activity with your children. These cookies are about fun, creativity, and making memories. The imperfections are part of the charm. The lopsided eyes, the uneven coating, the extra sprinkles that end up on the floor. It does not matter. The only thing that matters is the experience and the joy of making something together.
If I had to recommend a starting point, I would say start with the Spider-Man Web Oreos. They are the most recognizable and the most likely to get excited reactions from kids. The web design is simple enough for toddlers to help with, and the red color is bold and fun. From there, branch out to the recipe that fits your child’s favorite superhero.
No-bake superhero cookies are the perfect activity for a rainy afternoon, a birthday party, or a weekend treat. They are simple, fun, and delicious. And they prove that you do not need an oven to be a hero in the kitchen.