
The Labor Day potluck invitation that fills you with equal parts excitement and dread. The excitement of gathering with friends and family. The dread of showing up with a dish that sits untouched while everyone else’s plate empties. The pressure of bringing something that travels well, feeds a crowd, and actually tastes good. The potluck is a social minefield, and the food is the battleground.
Most potluck advice fails in real kitchens. The recipes that claim to be easy are often too plain to be memorable. The ones that claim to be impressive require complicated steps that are difficult to execute in a rush. And the ones that claim to travel well often arrive looking like a mess. The advice looks good on a blog but falls apart when you’re trying to transport a dish across town without spilling, and then keep it warm while you socialize. The gap between what looks good and what actually works is where the struggle lives.
These five potluck dinners solve specific problems. One is for the dish that travels perfectly in a slow cooker. One is for the dish that can be served cold or at room temperature. One is for the dish that feeds a crowd on a budget. One is for the dish that feels like a celebration. Every recipe has a reason to exist beyond being another potluck idea. They are built with real transport constraints, real serving conditions, and real crowd expectations in mind. No soggy salads, no dried-out meats, and no empty plates.
1. Slow Cooker Pulled Chicken Sliders
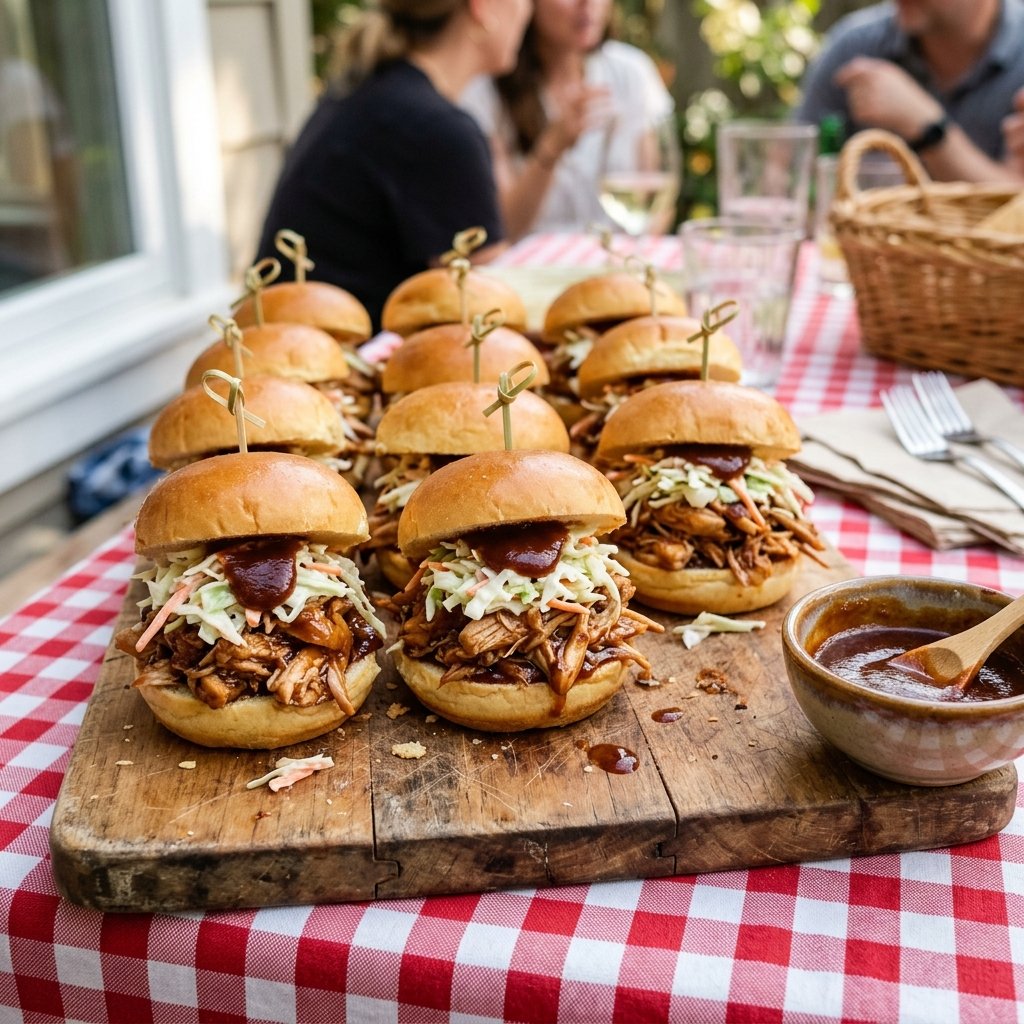
This is the potluck dish that everyone loves. The chicken cooks low and slow in a savory, tangy sauce until it is fall-apart tender. The sliders are easy to eat with one hand, and they travel perfectly in a slow cooker that keeps them warm for hours. The coleslaw adds a fresh crunch that balances the rich meat. The whole thing comes together with minimal effort.
Here is the part I would not skip. The chicken needs to be cooked until it is falling apart. If it is undercooked, it will be tough and difficult to shred. If it is overcooked, it will be dry and stringy. The sweet spot is when the chicken shreds easily with two forks. The slow cooker does the work. You just have to be patient.
Prep: 15 minutes Cook: 4 to 6 hours (slow cooker) Total: 4 hours 15 minutes Serves: 8 to 10 Difficulty: Easy
Ingredients
- 3 pounds boneless skinless chicken breasts or thighs
- 1 onion, sliced
- 4 cloves garlic, minced
- 1 cup barbecue sauce (sugar-free if desired)
- ¼ cup apple cider vinegar
- 2 tablespoons Worcestershire sauce
- 1 tablespoon smoked paprika
- 1 teaspoon salt
- ½ teaspoon black pepper
- Slider buns for serving
- Coleslaw mix for serving
Instructions
Place the chicken in the slow cooker. Add the onion, garlic, barbecue sauce, apple cider vinegar, Worcestershire sauce, paprika, salt, and pepper. Stir to coat the chicken. Cover and cook on low for 4 to 6 hours until the chicken is tender and shreds easily. Shred the chicken with two forks and stir it back into the sauce. Serve on slider buns with coleslaw on top.
Tips & Things That Go Wrong
The chicken can dry out if it is cooked too long. Check it at 4 hours. The sauce can be too thin if you add too much liquid. Use the barbecue sauce as the primary liquid. The sliders can be messy to eat. Serve with napkins and toothpicks.
Substitutions
Use pork shoulder instead of chicken. Use any barbecue sauce you like. For a dairy-free version, this recipe is already dairy-free.
Storage & Reheating
This keeps in the refrigerator for 4 days and freezes well for up to 3 months. Reheat in the slow cooker or microwave.
Approximate Nutrition Per Slider (1/10 of recipe): 290 calories, 20g protein, 26g carbs, 10g fat, 2g fiber
Cook the chicken until it falls apart with two forks. Under-cooked chicken is tough and difficult to shred.
2. Taco Salad Jars for a Crowd
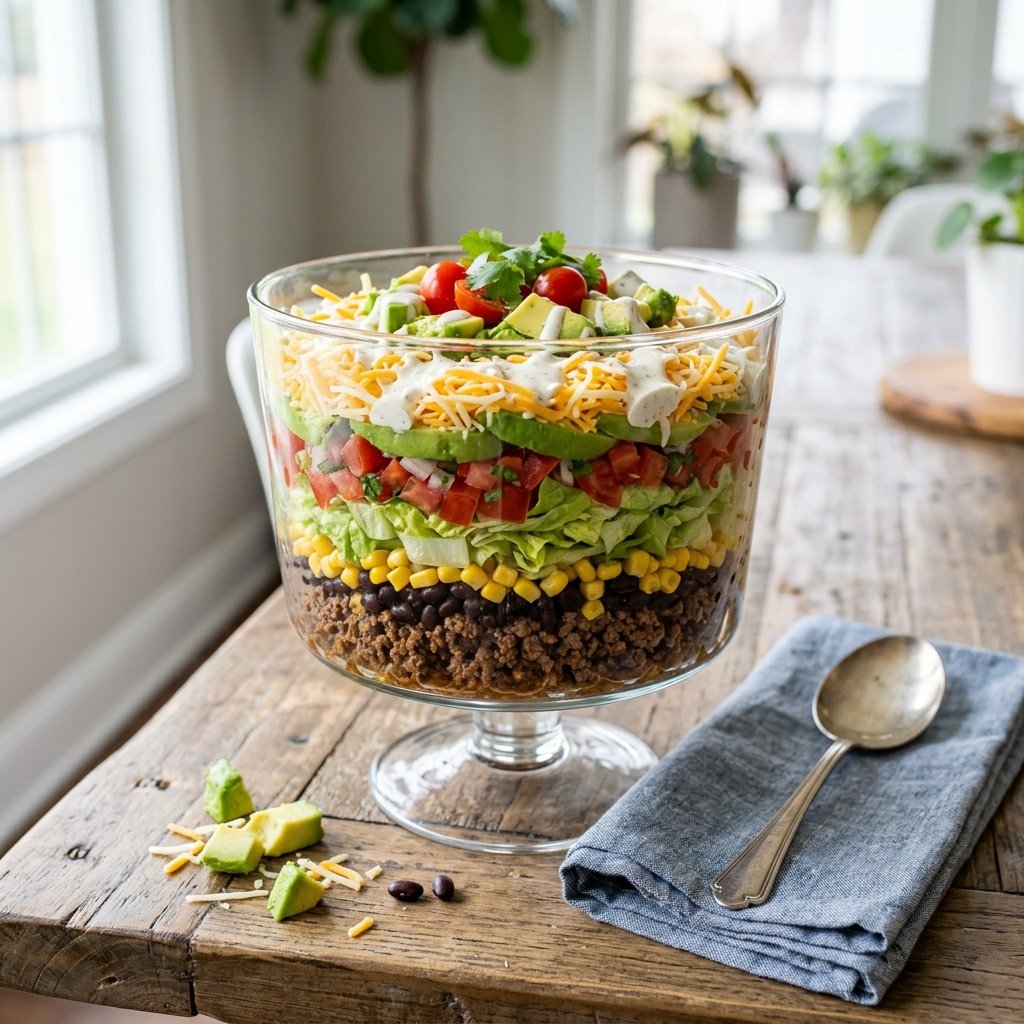
This is the potluck dish that looks as good as it tastes. The layered presentation is visually stunning, and the ingredients are fresh and colorful. The salad can be made ahead of time and assembled just before serving. The layers keep the ingredients from getting soggy, and the dressing is served on the side so everyone can add their own.
The trick is layering the ingredients in the right order. The heavy, wet ingredients go at the bottom. The light, crispy ingredients go at the top. This prevents the lettuce from getting soggy and keeps the salad fresh for hours. If you are making this ahead, wait to add the avocado and dressing until just before serving.
Prep: 20 minutes Cook: 15 minutes Total: 35 minutes Serves: 8 to 10 Difficulty: Easy
Ingredients
- 2 pounds ground beef
- 1 packet taco seasoning
- 2 heads romaine lettuce, chopped
- 2 cups cherry tomatoes, halved
- 1 can black beans, drained and rinsed
- 1 can corn, drained
- 2 avocados, diced
- 2 cups shredded cheddar cheese
- ½ cup ranch dressing
- Tortilla chips for serving
Instructions
Cook the ground beef in a large skillet over medium-high heat until browned. Add the taco seasoning and cook according to package directions. Let the beef cool slightly. In a large glass bowl or trifle dish, layer the ingredients in this order: beef, black beans, corn, tomatoes, cheese, lettuce, and avocado. The layers should be visible through the glass. Serve with ranch dressing and tortilla chips on the side.
Tips & Things That Go Wrong
The salad can be soggy if the lettuce is packed too tightly. Leave some air between the layers. The avocado can brown quickly. Add it just before serving or toss it with lime juice. The dressing can make the salad soggy if it is added too early. Serve it on the side.
Substitutions
Use ground turkey or chicken instead of beef. Use any beans you like. For a dairy-free version, skip the cheese and use a dairy-free dressing.
Storage & Reheating
This is best assembled fresh. The lettuce wilts over time. If you must make it ahead, store the components separately and assemble just before serving.
Approximate Nutrition Per Serving (1/10 of recipe): 360 calories, 22g protein, 18g carbs, 24g fat, 6g fiber
Layer the ingredients in the right order. Heavy ingredients at the bottom, light and crispy at the top. This keeps everything fresh and crisp.
3. Caprese Pasta Salad With Balsamic Glaze
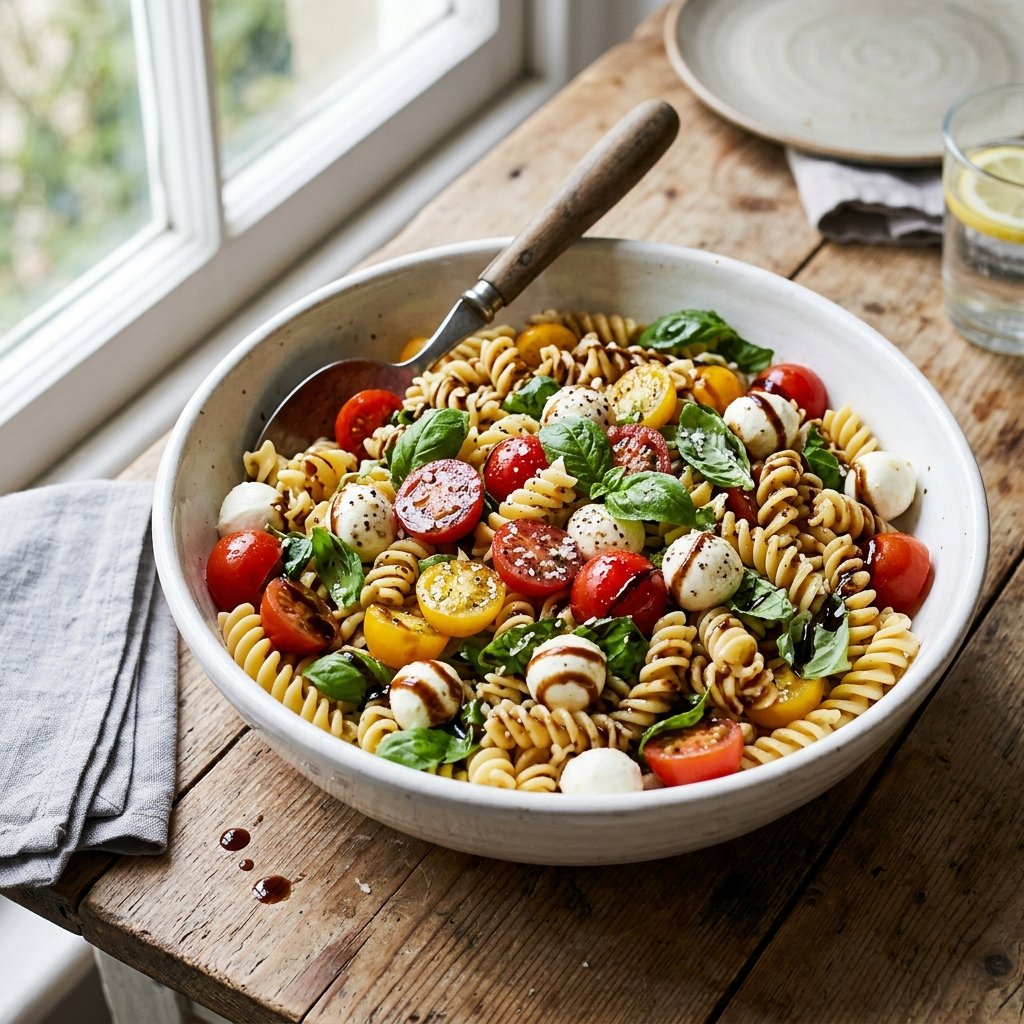
This is the potluck dish that feels like summer in a bowl. The pasta is tossed with cherry tomatoes, fresh mozzarella, and basil. The balsamic glaze adds a sweet tang that ties everything together. The salad can be served cold or at room temperature, making it perfect for a potluck.
One thing most recipe cards leave out is that the pasta should be cooked al dente and rinsed with cold water. Rinsing stops the cooking process and prevents the pasta from becoming mushy. It also removes excess starch that can make the salad sticky. This step is not optional.
Prep: 15 minutes Cook: 10 minutes Total: 25 minutes Serves: 8 to 10 Difficulty: Easy
Ingredients
- 1 pound pasta (penne, rotini, or shells)
- 1 pint cherry tomatoes, halved
- 8 ounces fresh mozzarella balls (bocconcini or ciliegine)
- ½ cup fresh basil leaves, torn
- ¼ cup olive oil
- 2 tablespoons balsamic vinegar
- 1 teaspoon salt
- ½ teaspoon black pepper
- ¼ cup balsamic glaze for drizzling
Instructions
Cook the pasta according to package directions until al dente. Drain and rinse with cold water to stop the cooking process. Transfer the pasta to a large bowl. Add the cherry tomatoes, mozzarella, basil, olive oil, balsamic vinegar, salt, and pepper. Toss to combine. Drizzle with balsamic glaze before serving. Serve cold or at room temperature.
Tips & Things That Go Wrong
The pasta can become mushy if it is overcooked. Cook it until al dente and rinse with cold water. The mozzarella can become rubbery if it is added too early. Add it just before serving. The basil can wilt if it is cut too far in advance. Tear it just before adding.
Substitutions
Use any pasta shape you like. Use a dairy-free cheese substitute for a dairy-free version. Use a gluten-free pasta for a gluten-free version.
Storage & Reheating
This keeps in the refrigerator for 3 days. The pasta will absorb the dressing over time, so add a splash of olive oil or balsamic vinegar before serving leftovers.
Approximate Nutrition Per Serving (1/10 of recipe): 290 calories, 10g protein, 32g carbs, 14g fat, 2g fiber
Rinse the cooked pasta with cold water to stop the cooking process. This prevents the pasta from becoming mushy and sticky.
4. Sheet Pan Fajita Bar With All the Toppings
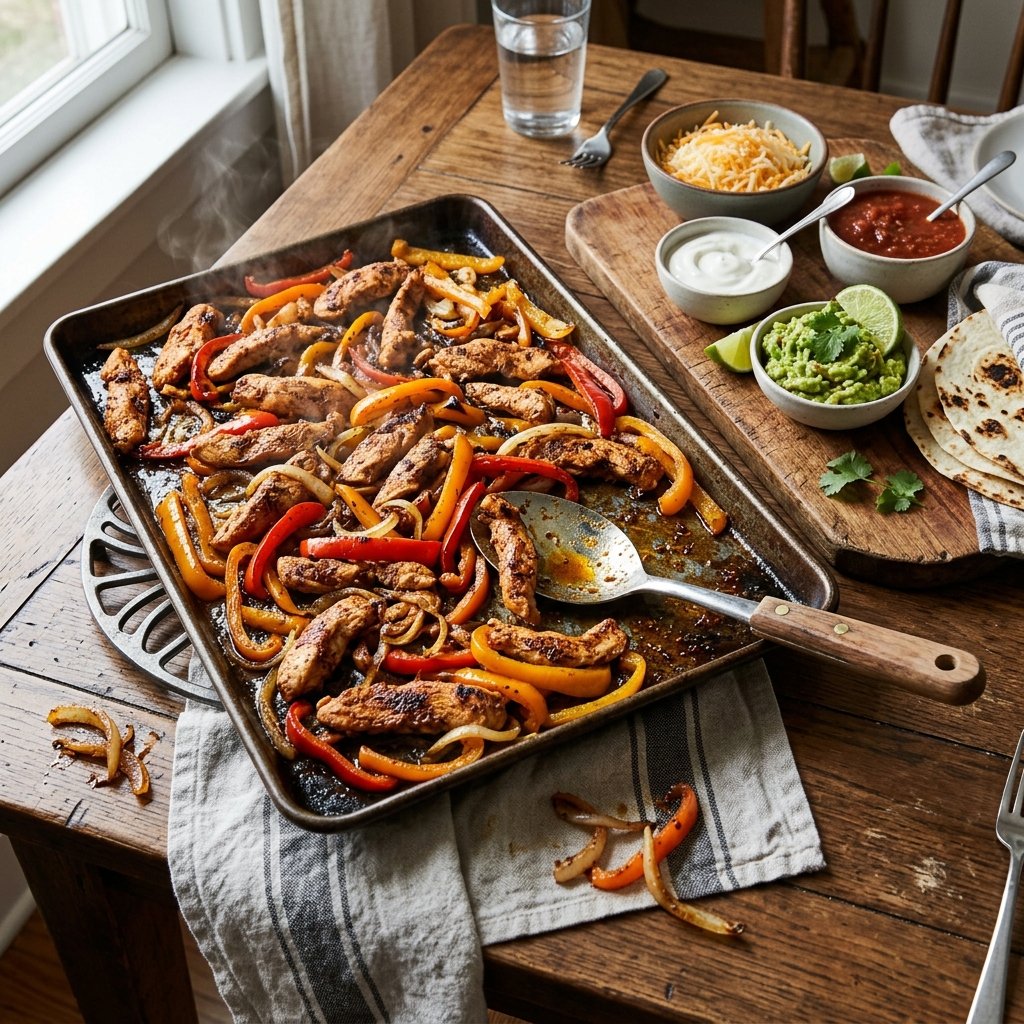
This is the potluck dish that feels like a party. The fajitas are cooked on a sheet pan, so they come out perfectly caramelized and juicy. The toppings bar allows everyone to customize their own meal. The whole thing is colorful, interactive, and deeply satisfying.
This is where the texture changes. The chicken and vegetables need to be cooked at a high temperature to get the caramelization that makes fajitas so good. A crowded pan will steam instead of roast. Use two sheet pans if necessary. The extra space is worth the flavor.
Prep: 15 minutes Cook: 20 minutes Total: 35 minutes Serves: 8 to 10 Difficulty: Easy
Ingredients
- 2 pounds boneless skinless chicken breasts or thighs, sliced thin
- 3 bell peppers (assorted colors), sliced
- 2 onions, sliced
- 3 tablespoons olive oil
- 2 tablespoons fajita seasoning
- 1 teaspoon salt
- Tortillas for serving
- Toppings: shredded cheese, sour cream, guacamole, salsa, and lime wedges
Instructions
Preheat the oven to 425°F and line a large baking sheet with parchment paper. In a large bowl, combine the chicken, bell peppers, onions, olive oil, fajita seasoning, and salt. Toss to coat. Spread the mixture in a single layer on the baking sheet. Roast for 18 to 20 minutes, stirring halfway through, until the chicken is cooked through and the vegetables are caramelized. Serve with warm tortillas and all the toppings.
Tips & Things That Go Wrong
The chicken can dry out if it is overcooked. Use a meat thermometer and pull it at 165°F. The vegetables can steam instead of roast if the pan is overcrowded. Use two pans if necessary. The fajita seasoning can be too salty. Taste and adjust before adding salt.
Substitutions
Use steak or shrimp instead of chicken. Use any vegetables you like. For a dairy-free version, skip the cheese and sour cream.
Storage & Reheating
This keeps in the refrigerator for 3 days. Reheat in the oven or skillet for the best texture.
Approximate Nutrition Per Serving (1/10 of recipe, without toppings): 240 calories, 24g protein, 12g carbs, 11g fat, 3g fiber
Roast the fajitas at a high temperature for caramelization. A crowded pan steams instead of roasts.
5. Easy Sheet Pan S’mores Bites
This is the potluck dessert that everyone will remember. The s’mores are baked on a sheet pan, so they come out perfectly toasted and gooey. The graham crackers provide crunch, the chocolate provides richness, and the marshmallows provide sweetness. The whole thing comes together in about 10 minutes.
The trick is broiling the marshmallows until they are golden and toasted. Watch them closely. They can go from golden to burnt in seconds. The chocolate should be placed under the marshmallow so it melts from the residual heat. The graham crackers should be sturdy enough to hold the toppings.
Prep: 5 minutes Cook: 5 minutes Total: 10 minutes Serves: 8 to 10 Difficulty: Very easy
Ingredients
- 1 sleeve graham crackers, broken into squares
- 1 cup chocolate chips or chopped chocolate
- 1 bag marshmallows (large or mini)
Instructions
Preheat the broiler. Arrange the graham crackers on a baking sheet in a single layer. Place a few chocolate chips on each graham cracker. Top with a marshmallow. Broil for 1 to 2 minutes until the marshmallows are golden and toasted. Watch closely to prevent burning. Serve warm.
Tips & Things That Go Wrong
The marshmallows can burn quickly under the broiler. Watch them closely and remove them as soon as they are golden. The chocolate can melt and run off the crackers. Place the chocolate chips in the center of each cracker. The graham crackers can break if they are not sturdy. Use whole crackers and break them carefully.
Substitutions
Use any chocolate you like. Use gluten-free graham crackers for a gluten-free version. For a dairy-free version, use dairy-free chocolate.
Storage & Reheating
These are best eaten immediately. The marshmallows will deflate and the chocolate will harden. If you have leftovers, reheat in the oven for a few minutes.
Approximate Nutrition Per Bite (2 per serving): 120 calories, 2g protein, 20g carbs, 4g fat, 1g fiber
Watch the marshmallows closely under the broiler. They can go from golden to burnt in seconds.
Frequently Asked Questions About Labor Day Potluck Dinners
What are the best dishes to bring to a potluck?
Dishes that travel well, can be served at room temperature, and feed a crowd are the best choices. Slow cooker dishes, pasta salads, and sheet pan meals are all excellent options. Avoid dishes that need to be served immediately or that are difficult to transport.
How do I transport food to a potluck without making a mess?
Use containers with tight-fitting lids. Wrap dishes in towels to keep them warm and prevent shifting. Use a slow cooker with a locking lid for hot dishes. For cold dishes, use a cooler with ice packs. Place a layer of paper towels in the bottom of the container to absorb any moisture.
How do I keep food warm for a potluck?
A slow cooker is the best option for keeping food warm. If you do not have one, use an insulated food carrier or wrap the dish in towels and place it in a cooler. Reheat at the host’s house if possible. Plan for your dish to sit for up to an hour before serving.
How much food should I bring to a potluck?
Plan for about 1/2 cup of side dish per person and 1/4 to 1/2 pound of meat per person. For a main dish, bring enough for 8 to 10 servings. It is better to bring too much than too little.
Can I make these recipes ahead of time?
Yes, most of these recipes can be made ahead of time. The pulled chicken, pasta salad, and fajitas can be made a day in advance. The taco salad is best assembled fresh, but the components can be prepped ahead. The s’mores bites are best made fresh.
Making Labor Day Potluck Dinners Work in Your Kitchen
The most important decision you will make is not which recipe to try first. It is how you approach the potluck. A successful potluck dish is about planning, not perfection. Choose a recipe that fits your schedule and your skill level. Prepare as much as you can the day before. Pack your dish carefully and transport it with confidence.
If I had to recommend a starting point, I would say start with the Slow Cooker Pulled Chicken Sliders. They are the most forgiving and the most likely to be a crowd-pleaser. The slow cooker does all the work. The sliders are easy to eat with one hand. And the leftovers are just as good the next day. From there, branch out to the recipe that fits your particular potluck situation.
Labor Day is about celebration, connection, and good food. These recipes are designed to make that easier. They are not fancy, and they are not complicated. They are practical, reliable, and built to actually work at a potluck. The empty plates at the end of the meal are the best feedback you can get.